Sharing Folders
You can share folders with other select webmail users from your same domain (i.e. @yourdomain.ca) . All mails in the folder will be available to the persons you are sharing with. Depending on the permissions other users can also save mails to this folder or delete messages.
Folders from within all different sections of Webmail can be shared, including Email, Calendars, Contacts, Notes and Tasks. The process for sharing these items is identical regardless of type.
These shared folders can also be accessed via desktop or mobile provided the users you share to connect to our services via IMAP, Activesync or MAPI. See also: Sharing Folders
To share a mail folder with other users
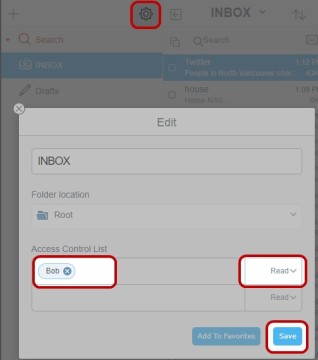
- Select the folder to be shared
- Click Edit (cog wheel icon).
- In section Access Control List add all users you want to share the folder with: Type their name or mail address and select from the list.
- Select the desired permission for each user by choosing from the select box: Read, Write, Admin, Custom. With the Custom option you can combine different options in greater detail: Lookup, Select, Seen, Flags, Insert, Create, Delete, Admin.
- Once the desired users and permission have been selected, click Save.
- After saving the sharing options each user will receive an email informing them about their access to the shared mail folder. They have to actively accept by clicking the Subscribe button in the mail received, or they must manually add the folder to their folder list (refer to the next section for instructions on both processes).
TIP: If you are sharing with many users and you want to grant different permissions to them do so by grouping the users by their permissions. To do this enter all users with the same permission on one line, then continue with the next group.
Subscribing to a folder which has been shared with you by another user
There are two methods to add folders which have been shared with you to your webmail interface.
- Automatically adding shared folders via email invite
- Manually adding shared folders
Adding Folders via Email Invite
When you receive an email with an invite to access to a shared folder, subscribe with the following steps:
- Log into webmail, and open the activation email in question.
- Click the Subscribe button at the top the activation email. Note that the Subscribe button is only present when the invitation email is viewed in webmail, it will not be present when viewing the email in a desktop or mobile email client.
- Confirm sharing access by clicking Save in the Folder Subscription dialog.
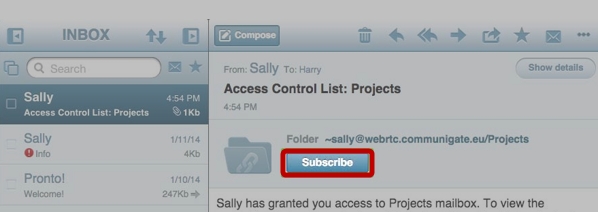
After that you will see the shared folder in your folder pane. On the top folder level there will be a folder with the name of the person sharing the folder. Beneath this folder you will find all folders shared by this person.
Manually Adding Shared Folders
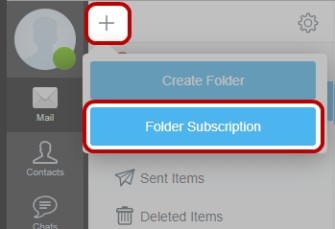
Instead of using a subscription invitation via email to confirm the subscription, you can manually add shared folders via the following steps:
- Click + in the toolbar of the folder pane.
- Choose Folder Subscription.
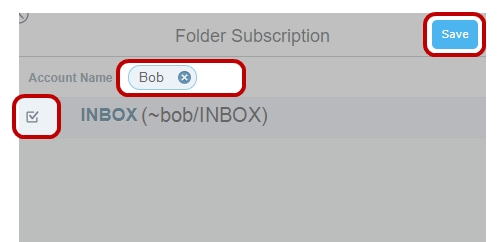
- Type the email address or name in Account Name of the user who is sharing the folder to perform a search, and press Enter.
- If the desired account does not appear, then it does not exist as typed. Check your spelling and try again.
- Select (check) the shared folder(s) to include in your folder list, and confirm by clicking Save.
- If the desired folder does not appear after a successful account search, then that folder has not been shared with you by its owner.
| NOTE: When using the manual procedure outlined above, the shared folders still need to be shared with you specifically by the original folder owner as specified in the steps See also: Sharing Folders |
Depending on the permission granted to you shared folders behave like normal “local” folders. Therefore you can:
- Select the folder to show its content
- Move emails into the folder (requires write permission)
- Delete emails from the folder (requires write permission)
If you do not need the folder anymore you can simply delete it. Deleting a folder which has been shared with you will not delete the 'source' folder located in the account of the owner of the folder.
Adding a Shared Folder to your Email Client
Most (but not all) email clients will be able to display folders which have been shared with you, along with their contents, provided that the email client is configured to connect to our mail server via IMAP, Activesync or MAPI. Mail clients configured to utilize a POP3 connection will not be able to display shared folders.
In addition to the steps noted above to actively subscribe to a folder that has been shared with you (See also: Sharing Folders), take the following steps to add this same folder to your own desktop or mobile email client:
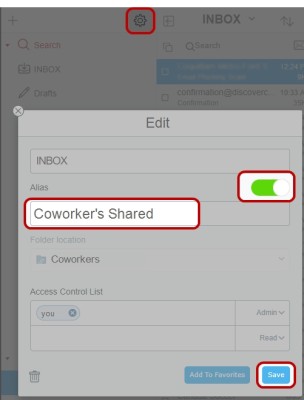
- In your own webmail interface, click and highlight the Shared Folder of the other use/account in question (the folder which has been shared to you by another user) from the left pane
- Click Edit (cog wheel icon) at the top of the left pane
- Toggle the Alias function to On and provide an Alias name for the shared folder.
- You may provide any Alias name you wish, and it is this Alias name that will appear within your desktop or mobile email client.
- Confirm by clicking Save
- After these steps, IMAP and Activesync email clients should automatically display the shared folder in their folder tree (a restart of the mail client may be required, if the folder is not immediately present). For MAPI connections, additional steps are required within your email client. See also: Additional Options