MAPI Connector
| NOTE: Webnames is no longer offering this product to new customers, but will maintain support for existing customers. Therefore these pages are provided for legacy support and reference purposes only. |
Installing the CommuniGate MAPI Connector
Start by downloading the Outlook Plugin Setup File (.zip) (Windows 32-bit) (Windows 64-bit installation file is available here.
After downloading, run Setup.exe to install or update the Outlook Plugin (also referred to as the CommuniGate![]() CommuniGate Pro is a client - server platform utilized by Webnames to provide world-class collaborative electronic communication solutions.
http://www.communigate.com Pro MAPI Connector). After successful install, the application may ask you to re-create your Mail Profile.
CommuniGate Pro is a client - server platform utilized by Webnames to provide world-class collaborative electronic communication solutions.
http://www.communigate.com Pro MAPI Connector). After successful install, the application may ask you to re-create your Mail Profile.
You can also use the same Setup.exe application to uninstall the Outlook Plugin from your computer at a later date if required.
Once installed you may choose to:
Configure Outlook from scratch
Add the Outlook Plugin to Outlook alongside other existing email accounts
Configuring Outlook from Scratch: Creating a new Mail Profile
- Open the Mail Control Panel (Start button -> Control Panel -> Mail icon) and click the Show Profiles button. The list of Mail profiles appears.
- Click the Add button to create a new Profile.
- On the next page, click the E-mail Accounts button
- On the next page, select the ‘Add a new e-mail account’ button and click Next
- On the next page, select the ‘Additional Server Types’ button and click Next
- On the next page, select Communigate Pro Server and click Next
Proceed to the Configure the MAPI Connector section of the guide for the steps to configure the Connector Properties
Using your existing Mail Profile: Add new email alongside your existing email accounts
- Open the Mail Control Panel (Start button -> Control Panel -> Mail icon) and click the Show Profiles button. The list of Mail profiles appears.
- Highlight the existing Mail Profile and click the Properties button.
- On the next page, click the E-mail Accounts button
- On the next page, select the ‘Add a new e-mail account’ button and click Next
- On the next page, select the ‘Additional Server Types’ button and click Next
- On the next page, select Communigate Pro Server and click Next
Configuring the MAPI Connector
Once the CommuniGate Pro service is added to a Mail Profile, the service settings can be configured.
Server
The Server panel allows you to specify the CommuniGate Pro Server and Account information:
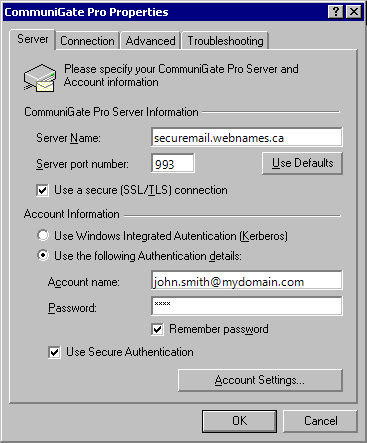
- Server Name: securemail.webnames.ca
- Server Port: 993
- Use a Secure (SSL/TLS) connection: Enabled
- Use Windows Integrated Authentication (Kerberos): Ensure that this option is unchecked
- Use the Following Authentication details: Enable this option and utilize the following settings
- Account Name: Full Email Address
- Password: Your Password
- Remember Password: If this option is not selected, the MAPI Connector will present a Login dialog box every time it needs to connect to the Server. If this option is selected, the supplied password is stored in the MAPI Connector settings data.
- Use Secure Authentication: Enabled
Account Settings
The Account Settings dialog box can be opened by pressing the Account Settings button.
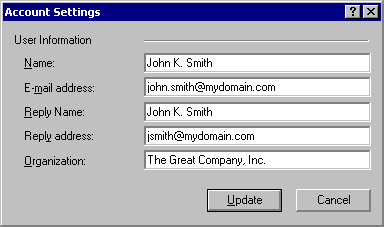
This is the final window that requires information to be entered as part of a standard installation. The remaining windows and settings are optional.