Contacts
In this chapter you will be introduced to the webmail Contacts App.
Contacts is your online address book. It helps you to find a person and reach out to them by email, phone or a chat.
The address book is an integral part of most section of webmail: it is needed when sending emails, or creating appointments in the Calendar App. E.g. when you start typing a recipient address in the Mail App (See also: Composing and Sending Email) a list of matching recipients will be displayed from the address book stored in the Contacts App.
The Contacts App is also the place to check the current personal online status – called presence -‐ of your contacts.
Navigating the Contacts App
To open the Contacts App click on Contacts in the Navigation bar. The app window is divided into two sections:
- Contact Groups (left pane): Groups help you to divide your contacts into lists
- Addresses (right pane): List of all addresses stored in the current group.
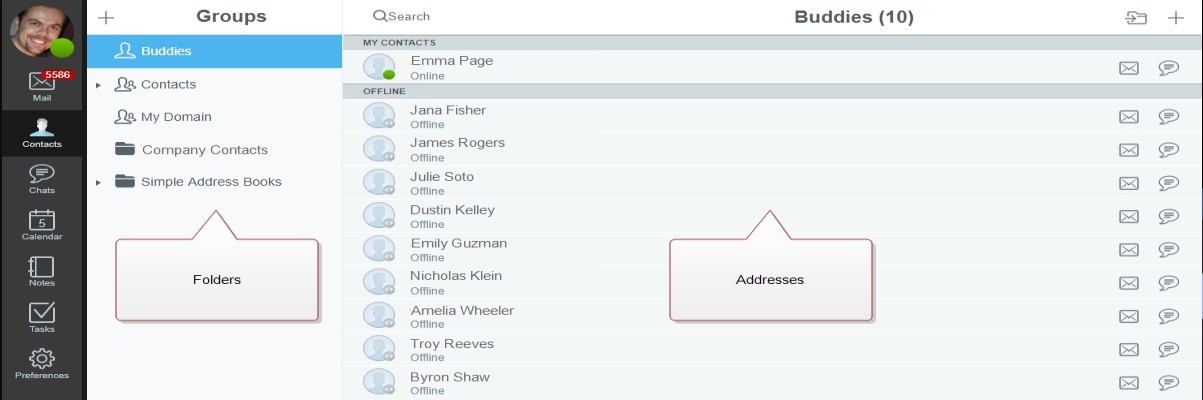
To open up an address and display its details,
- Select the appropriate Group in the left pane
- Click on the desired Contact in the right window.
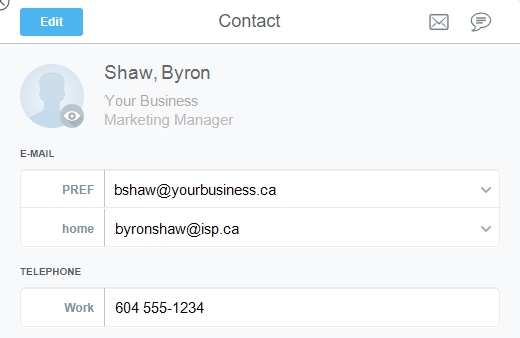
The selected contact will be displayed in the Contact popup window.
If you have many addresses stored in the Contacts App the search function will help you retrieve an address quickly:
- Click into the Search box at the top of the screen.
- Enter a search string. You can search for all details of a contact: Name, postal address, mail addresses, phone number etc.
- Press Enter.
All matching addresses will be listed in the right pane.
Creating a new Contact
To create a new contact,
- Select the group you want to add it to in the Contacts pane on the left,
- Click + in the toolbar of the right pane,
- Select New Contact.
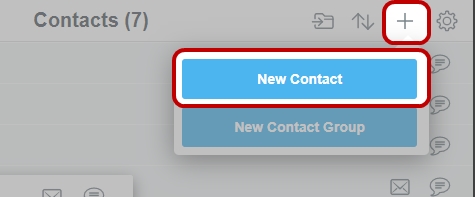
- Fill in the necessary information in the appropriate fields.
- Confirm by clicking Save.
To discard the contact click Cancel.
Things to know about the contact details you can store in the address book:
- There are no mandatory fields. Enter only the information you need for the contact you are editing. Please bear in mind, however, that at least an email address is needed to be able to connect to the person using webmail.
- File As is a field that will automatically be combined from First Name and Last Name. It is used for displaying the contact in the Contact App and everywhere addresses are used, e.g. when selecting recipients in the Mail Composer window.
- Every time you enter a new email address or phone number a new field will be added below so you can add more addresses or numbers. You can add as many email addresses and phone numbers as needed.
- A contact can have several postal addresses. Click Add New to add more postal addresses.
Creating a new contact from an email
This is an easy way to create a new contact.
- Click on the recipient’s email address in the Mail App.
- Click Create New Contact or Add to Existing Contact
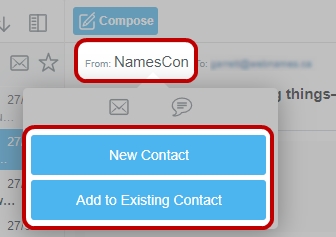
- Complete the address information in the contact window and click Save.
Adding an image
You can add an image to a contact. The format of the image you use needs to be either JPG, PNG or GIF.
- Open the contact and click Edit.
- Click Upload. This button is located on top of the image section.
- Select the image from your computer and click OK.
To remove an existing image click Clear.
Save all changes by clicking Save.
Deleting a Contact
- Select the contact.
- Click Edit.
- Click Delete at the bottom of the Edit Contact window.
Creating and using Contact Groups
Contact Groups are lists of contacts. You can group certain contacts in lists which helps you to
- Send an email to all group members,
- Have a chat with all members of a group,
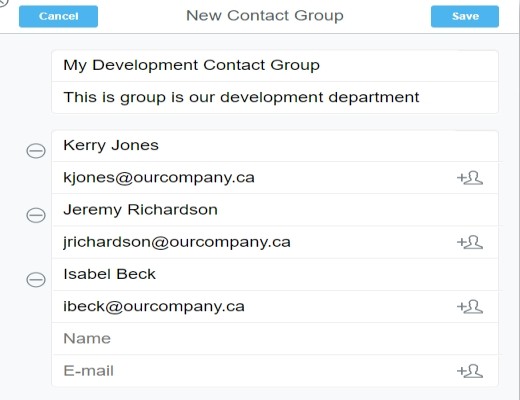
To create a Contact Group:
- Select the group in the left pane you want to add the Contact Group to .
- Click + in the toolbar of the right pane.
- Click New Contact Group.
- Enter a name for the Contact Group.
- Add all contacts to the Group – either by typing the name of the contacts or by selecting them from your address book.
- Complete creating the Contact Group with Save.
To use the Contact Group find it in the right pane and then click the corresponding icon for the desired communication channel:
- Click the Email icon to send an email to all members of the group.
- Click the Chat icon to invite all members of the group into a chat.
You can also contact a member individually by opening up the Contact Group and selecting one of the communication channels from the dropdown next to the name of the member.