Contact Groups
Groups are basically folders in your address book: You can use them to group your contacts in separate folders. You could e.g. have a folder for business contacts and one for private contacts. You can create as many folders (groups) as you like.
Your account contains several groups by default:
- Buddies: Your chat contacts.
- Contacts: Default group for contacts.
- SAFE / ALLOWED SENDER VS. BLOCKED SENDER
- Contacts appearing in your addressbook will be whitelisted, and mail from these senders will not be flagged as spam
- Contacts appearing in your Blocked address book will be blocked and you will not receive any email from these Contacts
- Recent Addresses: All addresses recently used but not contained in Contacts are automatically collected here.
Please refer to section Special Groups for information about Buddies and Recent Addresses.
Creating a new Group
You can create as many Groups as you like. Groups can also be created inside existing groups.
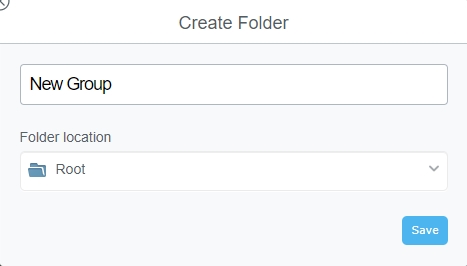
- Click + in the Groups window pane.
- Type a Group (folder) name.
- Select the Folder location from the drop down. Choose Root if you want to place the new folder on the top level.
- Confirm by clicking Save.
Editing, renaming or deleting Groups
To edit a Group:
- Click on the Group name from the list,
- Click Edit (Cog wheel icon) in the toolbar of the left pane.
- Edit the settings and confirm with Save.
To delete a group
Click Delete (trash can icon) and confirm the action.
| NOTE: When deleting a Group, all contacts contained in the Group will be deleted as well. |
Moving a contact to a Group
You can move any contact to any Group (except special groups):
- Open the contact.
- Click Edit.
- Click Move into....
- Select the Group you want to move the contact to from the list.
Sharing Groups
You are already familiar with sharing email folders with other webmail users. Much in the same fashion you can also share Contact folders.
Sharing enables you and the people you share with to have common lists of contacts that are kept and edited in one central place: when an address is added to a shared contacts folder it automatically becomes visible in the Contacts App of the users who share this folder.
To share a Group (folder):
- Click on the folder you want to share.
- Click Edit.
- In the section Access Control List add all users that you want to give access to the folder: Either type their name or mail address or select them from the address book.
- Select the access right each you want to grant: read, write, administration, custom.
- Confirm by clicking Save.
To subscribe to a folder that has been shared with you,
- Click the Subscribe button in the mail you have received informing you about the sharing of a folder.
Or
- Click + in the left Group pane, click Folder Subscription, enter the account name or e-‐mail address of the user who is sharing their folder with you, set the checkbox for the shared folder and confirm with Save.
Special Groups
Your account contains several special groups that have been created automatically for you and which you cannot delete.
Buddies
Buddies are special contacts. Contacts with Buddy status can share and see their personal presence status which facilitates real time communications by chat and telephone.
To establish Buddy status you have to request it from the other user. Once this request has been confirmed you both will be able to see each other’s presence status.
Adding a Buddy
- Create a new contact in the Buddies folder. Specify the email address of your future buddy and click Save.
- Your contact will receive a Contact request by email. After they confirm your request you will be able to see their current presence status in your Buddy folder list.
As long as your contact has not confirmed your request their contact will be shown in strikethrough fashion to indicate you are not connected as buddies yet.
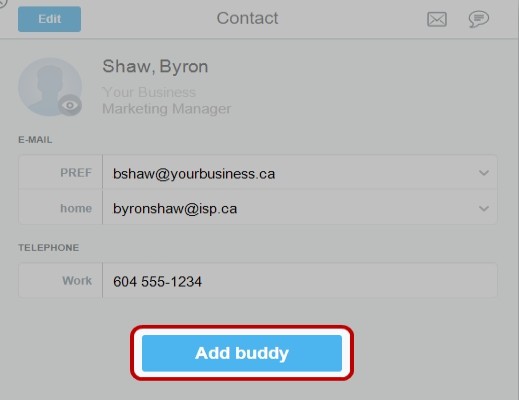
Creating a Buddy from an existing contact
To establish Buddy status with an existing contact:
- Select the contact.
- Click Add Buddy.
Confirming a Buddy request
When one of your contacts requests Buddy status you will receive an email message with their request.
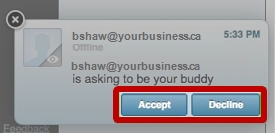
- To confirm the request, within webmail click Accept.
This will create a new contact in your Buddies folder where you can see the presence of your contact.
- To decline the request, within webmai click Decline.
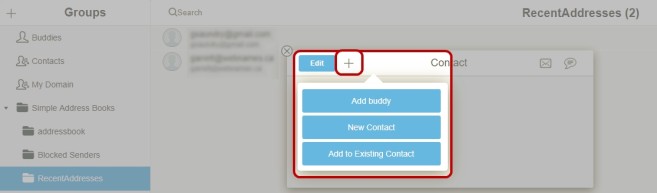
Recent Addresses
Contacts you were recently in touch with over email or chat and who have not yet been saved in your address book will automatically be listed in the Recent Addresses special folder. You can find this special folder below the Simple Address Books root folder.
You can create Contacts from these addresses or add them to an existing contact with just two clicks:
Click on the address.
Click + and choose New Contact or Add to Existing Contact.
Presence status
In your list of contacts the personal presence status of each contact like Online, Offline or Busy will be indicated. This helps you to determine at a glance if a person is reachable at the moment.
Your own presence status is shown in the profile image in the top left corner of the webmail window.
To change your status:
- Click on your profile image.
- Pick a status from the list by clicking it. In addition you can change the status text by typing your own status message at the bottom of the window. When you are done press Enter
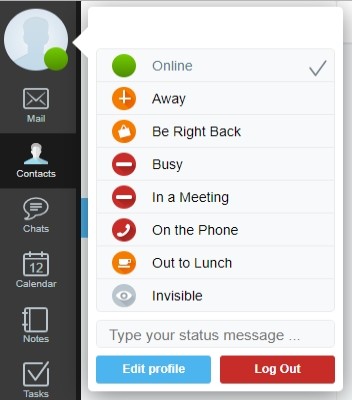
In some cases your presence status will be updated automatically:
- Away will be shown after you have not been active for some time in webmail. After you start working again it will automatically change back to Online.
- Invisible will be shown to your contacts when you log off from webmail.
Exporting addresses
You can export multiple addresses in a single action from the Contacts App. The export will create the widely used VCard file format. You can use the resulting file to import the addresses in a different program saving you from having to type all addresses again.
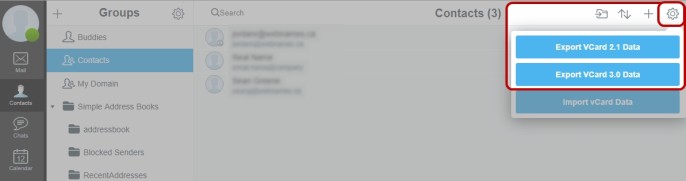
To export addresses:
- Select the group from which you want to export addresses.
- Click on More (cog wheel icon) in the toolbar of the right pane.
- Select the file format – either VCard 2.1 or VCard 3.0 – by clicking the appropriate button. The file containing the addresses will be downloaded in the browser.
Importing addresses
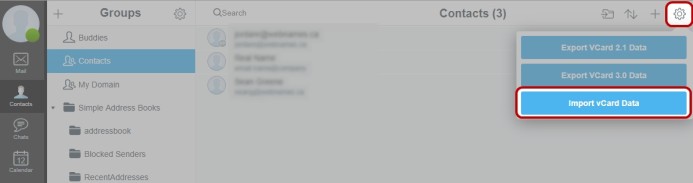
You can import addresses. You will need an address file in the VCard format. To import addresses,
- Select the group you want to import addresses into.
- Click on More (cog wheel icon) in the toolbar of the right pane.
- Click Import vCard Data.
- Select your address file and confirm with OK.
Note: Contact Groups cannot be exported.