DKIM
Overview of DKIM
DomainKeys Identified Mail![]() DomainKeys Identified Mail (DKIM) is an email authentication method designed to detect forged sender addresses in email (email spoofing), a technique often used in phishing and email spam.
DKIM allows the receiver to check that an email that claimed to have come from a specific domain was indeed authorized by the owner of that domain. It achieves this by affixing a digital signature, linked to a domain name, to each outgoing email message. The recipient system can verify this by looking up the sender's public key published in the DNS. A valid signature also guarantees that some parts of the email (possibly including attachments) have not been modified since the signature was affixed. (DKIM) is an email authentication method designed to detect email spoofing. It allows the receiver to check that an email claiming to come from a specific domain was indeed authorized by the owner of that domain. DKIM uses a digital signature, which is added to the email's header and verified by the recipient's mail server using the sender's public key.
DomainKeys Identified Mail (DKIM) is an email authentication method designed to detect forged sender addresses in email (email spoofing), a technique often used in phishing and email spam.
DKIM allows the receiver to check that an email that claimed to have come from a specific domain was indeed authorized by the owner of that domain. It achieves this by affixing a digital signature, linked to a domain name, to each outgoing email message. The recipient system can verify this by looking up the sender's public key published in the DNS. A valid signature also guarantees that some parts of the email (possibly including attachments) have not been modified since the signature was affixed. (DKIM) is an email authentication method designed to detect email spoofing. It allows the receiver to check that an email claiming to come from a specific domain was indeed authorized by the owner of that domain. DKIM uses a digital signature, which is added to the email's header and verified by the recipient's mail server using the sender's public key.
Features and Benefits of DKIM
- Email Authentication: DKIM helps verify that the email was sent by an authorized mail server, reducing the risk of email spoofing.
- Integrity Check: It ensures that the email content has not been altered during transit.
- Improved Deliverability: Emails signed with DKIM are less likely to be marked as spam, improving deliverability rates.
- Enhanced Security: By preventing email spoofing, DKIM helps protect against phishing attacks and email fraud.
- Brand Protection: It helps maintain the sender's reputation by ensuring that only legitimate emails are sent from their domain.
How DKIM Works
DKIM uses asynchronous encryption to secure emails. This means it uses a pair of keys:
- A private key to create a unique signature for each outbound email, and
- A public key to which is later used to verify that signature.
Creating a DKIM Signature via Private Key
A private key resides on the mail server, and is used by the server to generate a special code (the DKIM signature) by combining each outbound email's content with the private key. The sender's email server generates a unique DKIM signature for each email.
Adding the DKIM Signature
The generated DKIM signature is added to the email's header as a DKIM-Signature field.
Example header fields in a DKIM-signed email:
Sending the Email
The email, now containing the DKIM signature, is sent to the recipient.
Verifying the DKIM Signature via Public Key
The public key, published in the domain's DNS records, allows the email recipient's server to check this signature and confirm the email's authenticity and integrity. Upon receiving the email, the recipient's mail server retrieves the sender's public key from the sender's domain's DNS records.
Example TXT Record in a sender's DNS:
The server uses this public key to decrypt the DKIM signature and compares the decrypted hash with a newly generated hash of the email's content.
If the hashes match, it confirms that the email has not been altered and is indeed from the claimed sender.
This process helps ensure that the email is genuinely from the claimed sender and hasn't been tampered with.
Implementing DKIM
Webnames.ca email customer can enable DKIM signing for their email services via their Webnames.ca account.
Prerequisites for DKIM
- Sender email must be hosted by Webnames.ca
- Sender must be able to add a TXT record to their domain's DNS
- Since all legitimate sources of email must be signed with the proper DKIM signature, at this time Webnames must be the only source of legitimate email for the sender's domain. No other mail systems/platforms can be in use*.
*This limitation is subject to change over time. Technically speaking, in order to allow multiple sources/platforms to all be considered legitimate sources of DKIM-signed email, each mail provider/platform must sign all outbound email using the same private key.
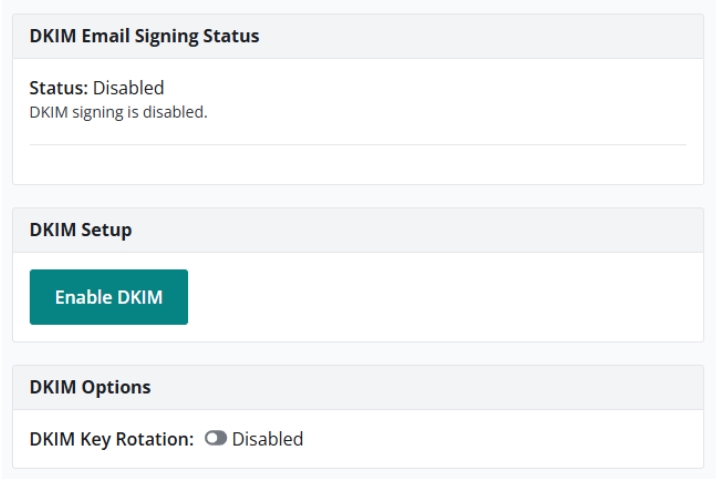
Process for enabling DKIM
Ensure that all the aforementioned prerequisites are met.
Click the link below to access the domain(s) that have Webnames.ca email services, and if necessary click on the specific domain you'd like to apply DKIM to.
CLICK HERE TO ACCESS YOUR WEBNAMES.CA EMAIL SERVICES
Click the Email tab, and click the Manage button under Manage Accounts and Settings.
Click DKIM in the left margin.
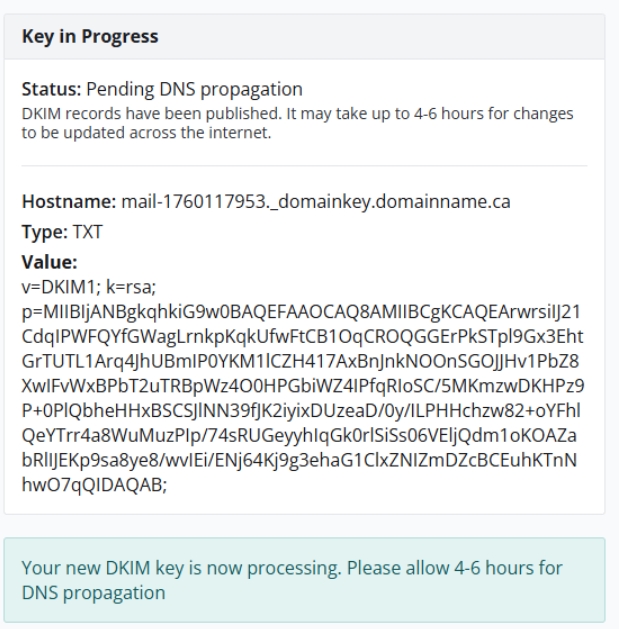
Provisioning
If Webnames hosts the domain's DNS, the required TXT record will be applied to the domain automatically. After a waiting period to check that this new DNS record has propagated globally, DKIM signing will be enabled on the domain's email service. No further steps or action is required. You will receive a confirmation email once DKIM is active.
If a third-party hosts the domain's DNS, the required DNS TXT record will be provided on-screen. This TXT record need to be applied to the domain's DNS zone at the third-party DNS provider. Webnames' systems will check periodically for the existence and global propagation of this TXT record, and once confirmed, DKIM signing will be enabled on the domain's email service. Once this step has been completed, no further steps or action is required. You will receive a confirmation email once DKIM is active.
DKIM Key Rotation
You can optionally enable DKIM Key Rotation, which:
- Generates a new key pair every 180 days.
- Updates your DNS records automatically (if using Webnames DNS).
- Helps maintain strong security over time