DNSSEC
DNSSEC is a suite of DNS records that are used by DNS resolvers to verify the authenticity of DNS responses they receive.
DNSSEC allows verification to be possible through three DNS Record Types, and two concepts:
DNS Record Types
- DNSKEY Record Contains the Public Key portion of the Public and Private Key pair that are used to encrypt (sign) DNS Records
- RRSIG Record The encrypted (signed) version of each DNS Record
- DS Record The encrypted (signed) version of the DNSKEY Record itself
Security Concepts
Verification that the DNS Records have not been tampered with
Via PKI encryption, the DNS records are cryptographically signed by the DNS software platform using a private key and public key pair, and the public key (RRSIG Record) necessary to decrypt the DNS records is published as a DNS record as well (DNSKEY Records) . Through these two records, a DNS resolver, performing a DNS lookup on behalf of a client/user can:
- Obtain the DNS records it seeks (in encrypted RRSIG Record format), and
- Decrypt them using the public DNSKEY Record.
Because the RRSIG Record can be decrypted with the DNSKEY Record, it can be verified that the RRSIG Record originated from the same place/person (this person performed the encryption with a private key which only they possess), and have not been tampered with by someone else.
Verification that the DNS Records originated from the same party that owns the domain name
The authenticity of the publicly available DNSKEY Record needs to be vouched for by a third party, in so as to state that the DNSKEY Record was created by the same place/person as was the rest of the DNS zone file. This is accomplished via a DS Record, which has two components to it's effectiveness:
- The DS Record is hosted on the parent TLD's name servers (the .CA or .COM name servers, for example). Only accredited domain Registrars have the necessary access to insert these DS Records onto the TLD's name servers. Registrants, IT Administrators etc who wish to implement DNSSEC must therefore do so through their domain Registrar, whom will have their own set of customer verification protocols in place. Thus, due to the restricted nature of the parent TLD name servers, the existence of a DS Record for a domain on said nameservers is considered authentic and verified.
- The DS Record contains a cryptographically signed version of the domain's entire zone file. If either the zone file changes (located on the domain's name servers) OR the signature changes (located at the parent TLD's name servers), then they will no longer match and a forgery has occurred. Subsequently the DNS records will be rejected by the DNS resolver performing the query on behalf of a user. So long as the zone file and it's encrypted signature do match, then the DNS resolver can with certainty verify that they DNS records it seeks are authentic.
Because the DS Record is located on the internet in a place that is only accessible to the person/party that owns the domain name, and because the DS Record cryptographically matches the DNSKEY Record that is found over on the name servers for the domain, it can be verified that the DNSKEY Record is authentic and has not been tampered with by someone else.
For Domains with DNS HOSTING by Webnames.ca
DNSSEC is available on all gTLDs and most ccTLDs as a feature within our Premium DNS Hosting Plan.
If this Plan is already in place on your domain, then to apply DNSSEC, please refer to the following Premium DNS documentation: See also: Premium DNS
For Domains with Website Hosting by Webnames.ca
Currently Webnames does not yet support DNSSEC for domains that have websites hosted by Webnames.ca (i.e. those that have one of our Value, Advantage or Pro website hosting packages). Look for this feature to be release in the spring of 2019.
For Domains with DNS hosted by another provider
For domains that have DNS provided by a party other than Webnames, there are three discrete steps required to implement DNSSEC:
- Digitally sign the DNS zone file
- Insert DNSKEY and RRSIG Records into the zone file
- Insert the DS Record into the parent TLD's zone file
DNS Record Types and DNSSEC
- The domain's zone needs to be digitally signed via the DNS platform hosting the actual DNS for the domain (i.e. BIND, Power DNS), and three record types produced:
- DNSKEY
- RRSIG
- DS
- The DNSKEY and RRSIG Records are to be hosted within the DNS zone for the domain, on the nameservers that hosts said zone. In other words, these two records need to be inserted and hosted alongside the domain's A, CNAME and MX records etc are.
- The DS Record is hosted on the TLD's nameservers, i.e. the .COM or .CA name servers.
- Registrants, IT Administrators etc. do not have direct access to the TLD nameservers. Therefore, the DS record created in step 1 above can only be added to the TLD nameservers via the Registrar for the domain itself (e.g. Webnames.ca)
Configuring DNSSEC
This section covers the steps required to have a DS Record(s) for a signed zone inserted onto the nameservers of the parent TLD, for domains who's DNS is hosted by a party other than Webnames.ca. For domains who's DNS is hosted by Webnames.ca, please see For Domains with DNS hosted by Webnames.ca.
- Log into your Webnames.ca account
- Using the top menu, click on Account then under Domains, click Manage Domains.
- Click on the domain name you wish to configure from the list.
- Click on the DNSSEC tab.
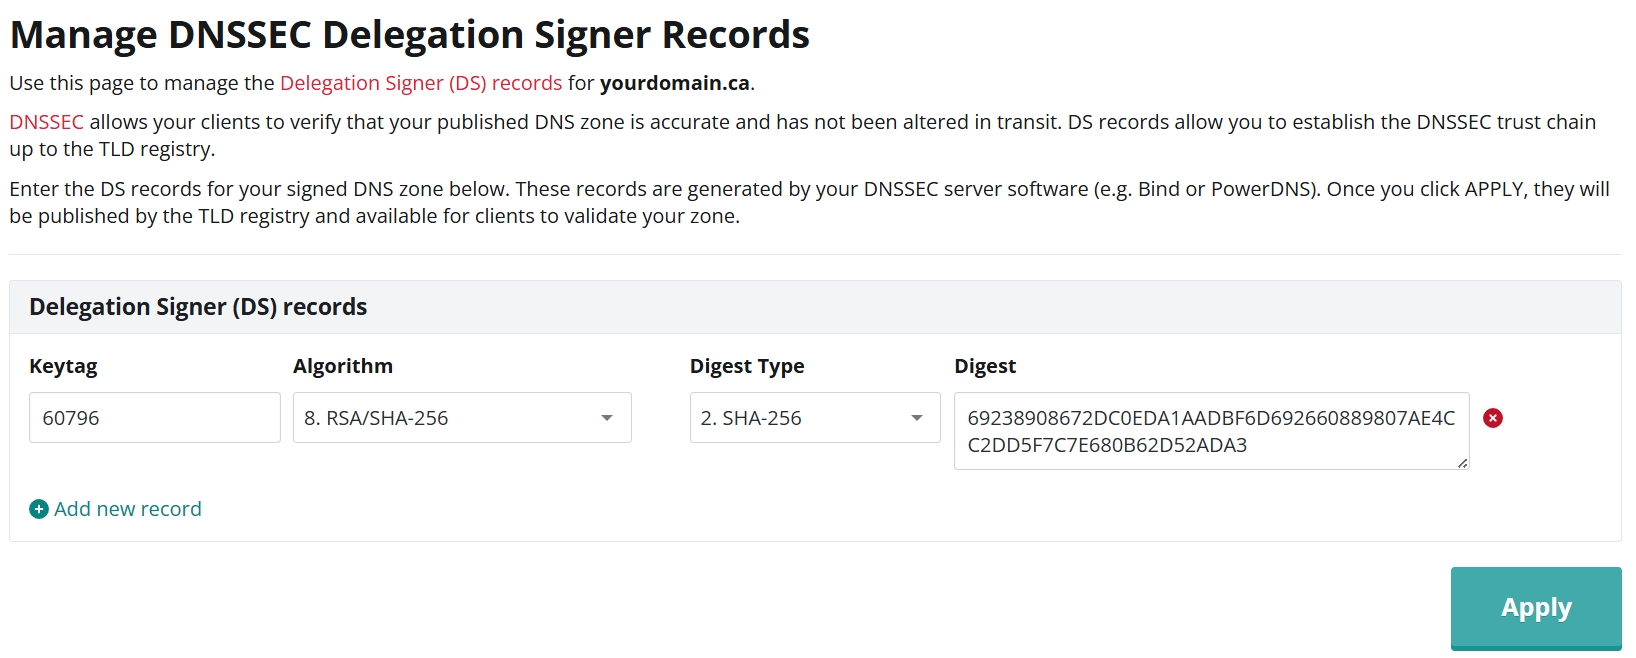
- Under Delegation Signer (DS) Records, enter the following:
- Keytag
- Algorithm
- RSA/MD5
- Diffie-Hellman
- DSA/SHA1
- Reserved RSA/SHA-1
- DSA-NSEC3-SHA1
- RSASHA1-NSEC3-SHA1
- RSA/SHA-256
- Reserved
- RSA/SHA-512
- Reserved
- GOST R 34.10-2001
- ECDSAP256SHA256
- ECDSAP384SHA384
- Ed25519
- Ed448
- Digest Type
- SHA1
- SHA-256
- GOST R 34.11-94
- SHA-384
- Digest (Hash)
- Click Add new record to add additional DS Records as needed
- Click Apply