Connecting a Domain Name to Blogger
The process outlined in this article incorporates steps taken from within:
- Your Blogger Account
- Your Webnames Account
NOTE: To connect your domain name to your Blogger site, either our Advanced DNS or Premium DNS services are required.
About the Blogger Instructions
The steps for your Blogger account, which appear below, are taken from the following Blogger article : Connect to your non-Google domain from Blogger.
The Blogger steps are for accomplishing two things:
- Connecting your domain name to your Blogger site.
- Proving you own the domain name you are connecting to.
Steps within your Blogger Account
Specify the Domain Name to use with your Blogger site
- Sign in to Blogger.
- Select the blog you want to update.
- On the left, click Settings and then Basic.
- Under "Publishing," click + Setup a 3rd party URL for your blog.
- Type in your Webnames.ca domain name.
- Click Save.
Locate the Two Blogger CNAME Records you'll Need to use in your Webnames Account
You'll see an error with two CNAMEs (outlined in green below) in your Blogger account.

Make note of these values.
- The first pair of values are for the linking of your Blogger site to your Webnames domain name.
- The second pair of values are for verifying ownership of the domain name your are linking to.
Leave this Blogger window open so that these values can be copied and pasted into your Webnames account.
Steps within your Webnames.ca Account
Log into your Webnames Account and Navigate to the DNS section of your Domain
- Go to your Webnames.ca account and once logged in navigate to your domain name's management page
- Select to Configure the DNS Hosting service, or proceed to purchase DNS Hosting if this service is not already in place.
Configure your Webnames DNS Hosting
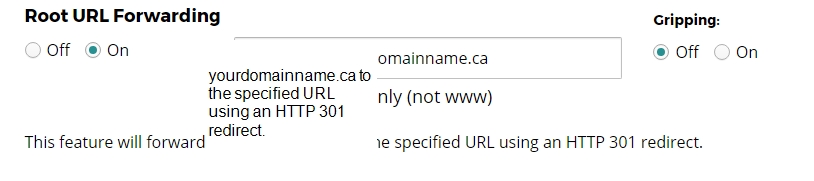
- Step 1 Locate the Root URL Forward section, turn it on, and enter your domain name, including the www
- (e.g. http://www.yourdomain.ca)
- Ensure that 'Forward root only (not www)' is checked.
- Gripping should be Off
- Step 2 Forward the www version of your domain name to your Blogger site (i.e. create a CNAME for the first pair of records as noted in your Blogger account in the steps above)
- e.g. www.yourdomainname.ca -> ghs.blogger.com

- Step 3 Create an additional CNAME Record as indicated by Blogger to demonstrate ownership of your Webnames.ca domain name. (i.e. create a CNAME for the second pair of records as noted in your Blogger account in the steps above)
- e.g. cwqob3r2t2qg.yourdomainname.ca -> gv-bjxryhg6wtetfd.dv.googlehosted.com
- The above is an example only. For the actual record you are creating, use the values that appear in your Blogger account.

- Step 4 Click Apply Now
- Wait for your DNS settings to propagate across the Internet.This can take a number of hours to occur.
- Once propagated, you will be able to reach your Blogger site via either yourdomain.ca or www.yourdomain.ca