Updating WordPress Installations
To keep your website secure, you need to regularly update the WordPress core, as well as any installed plugins and themes. You can do this either automatically or manually:
- Manual updates give you control over when updates are installed. For example, you can wait and see if installing a particular update caused issues for other WordPress users. However, you need to remember to update regularly to avoid falling behind.
- Automatic updates give you peace of mind by keeping your WordPress installation up-to-date. However, updates can sometimes break your installation, and with automatic updates, you may not learn about it right away.
For security reasons, we recommend that you configure automatic updates.
To update a WordPress installation manually:
- Go to WordPress. If your WordPress installation needs updating, you
will see “available” next to “Updates” (below the website
screenshot).

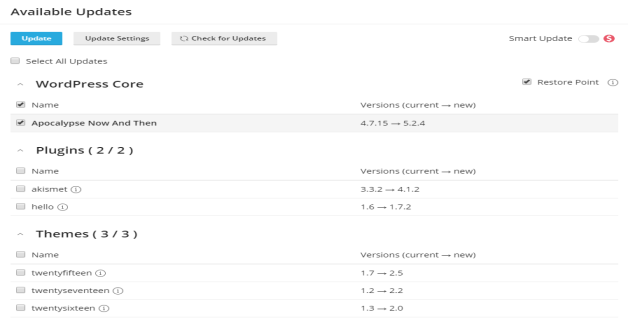
- Click “View” next to “Updates”, wait for WordPress Toolkit to load
the list of available updates, and then select the updates you want
to install.
Note: If an update of a WordPress core is available, you will see the “Restore Point” checkbox. Keep this checkbox selected to create a restore point you can use to roll back the update if something goes wrong.
- Click Update.


The selected updates will be applied.
To configure automatic updates for a WordPress installation:
- Go to WordPress and choose the WordPress installation that you want to update automatically.
- Click “View” next to “Updates”, and then click “Settings”.
- Choose the desired automatic update settings. You can configure
automatic updates separately for WordPress core, plugins, and themes
(for example, you can choose to enable automatic updates for plugins
and themes, but not for WordPress core). Follow these
recommendations:
- Selecting “No” next to “Update WordPress automatically” turns off automatic updates of WordPress core. This is insecure.
- If your website is publicly available (production) and you are concerned that applying updates automatically may break it, select “Yes, but only minor (security) updates”.
- If your website is a non-public (staging) version of a WordPress website, select “Yes, all (minor and major) updates”. This will keep your staging website up-to-date and ensure that, should an update break something, it happens to the staging website and not to the production one.
- Click OK.
Updating a Website URL
If you have moved a website from a different server, the website URL![]() In computing, a uniform resource locator (URL) (originally called universal resource locator) is a specific character string that constitutes a reference to an Internet resource.
Both www.webnames.ca and www.webnames.ca/domain are examples of a URL may change.
In this case, your migrated WordPress installation will not work until the website URL is updated in WordPress.
Previously, you had to do this manually. Now WordPress Toolkit can update the website URL automatically.
In computing, a uniform resource locator (URL) (originally called universal resource locator) is a specific character string that constitutes a reference to an Internet resource.
Both www.webnames.ca and www.webnames.ca/domain are examples of a URL may change.
In this case, your migrated WordPress installation will not work until the website URL is updated in WordPress.
Previously, you had to do this manually. Now WordPress Toolkit can update the website URL automatically.
To update the website URL:
- Go to WordPress, choose the card of the website that you have migrated, click the
 button,
and then click Update Site URL.
button,
and then click Update Site URL. - WordPress Toolkit compares the actual website URL with the one specified in the WordPress database and in
wp-config.php:- If the URLs match, then your website URL is up to date. Click Back to return to the website card.
- If the URLs do not match, replace the URL specified in WordPress with the actual URL by clicking Update.
