Managing Themes
A WordPress theme determines the overall design of your website including colors, fonts, and layout. By selecting a different theme, you change the look and feel of your website without changing the content. With WordPress Toolkit, you can install and manage themes.
Installing Themes
In WordPress Toolkit, you can install themes on one or all WordPress installations of the subscription. You can:
- Search for and install themes found in the wordpress.org themes repository.
- Install themes uploaded by the Plesk
 Plesk Panel is the preferred choice for hosting service providers, web designers, and website owners. Plesk Obsidian 18 is the latest release from Plesk and offers a range of new benefits and features for every user type. administrator.
 - Upload custom themes, which is useful if you cannot find a suitable theme in the wordpress.org repository or if you need to install your own theme.
To install themes on a particular WordPress installation:
- Go to WordPress, go to the “Themes” tab of an installation card, and
then click Install.

- Search for themes, and then click Install next to the theme you want to install. By default, a newly installed theme is not activated.

To install themes on all WordPress installations of the subscription:
- Select the desired subscription.
- Go to WordPress > the “Themes” tab, and then
click Install.

- Search for themes, select the themes you want to install, and then click Select websites.
Note: Selecting one or more themes and then performing a new search without installing the selected themes resets the selection.
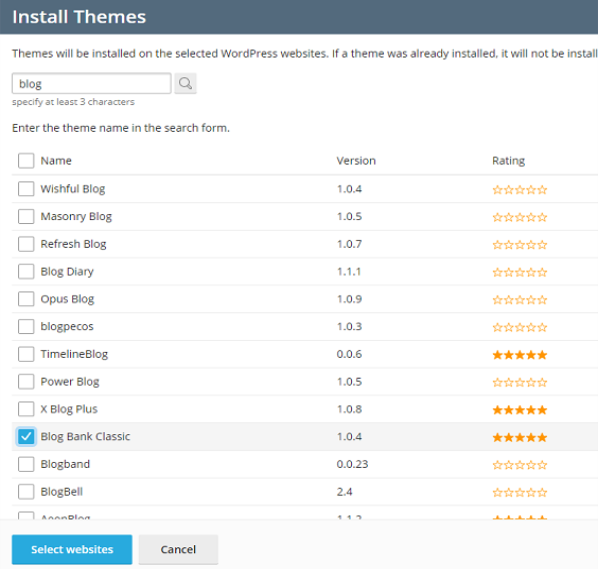
- Select websites on which you want to install themes and then click Install.


To install themes uploaded by the Plesk administrator:
- Go to WordPress > the “Themes” tab.
- Click Install next to a theme marked with the
 icon. If you see no such icons, it means that the Plesk administrator
has not uploaded any themes.
icon. If you see no such icons, it means that the Plesk administrator
has not uploaded any themes. - Select the WordPress installations on which you want to install the theme.
- By default, installed themes uploaded by the Plesk administrator are activated immediately. You can prevent this by clearing the “Activate after installation” checkbox.
- Click Install.

To upload a theme:
- Select the desired subscription.
- Go to WordPress > the “Themes” tab, and then click Upload theme.
- Click Browse… and browse to the location of the ZIP file
containing the theme you want to upload.
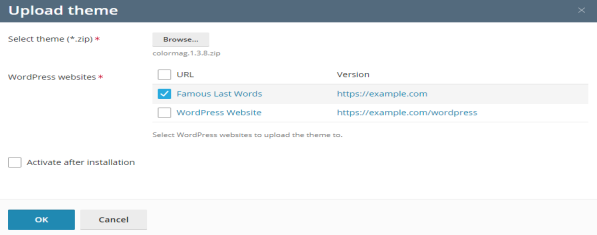
- Select the WordPress installations on which you want to install the theme.
- By default, a newly uploaded theme is activated. You can deactivate it by clearing the “Activate after installation” checkbox.
- Click OK.

To install an uploaded theme:
- Go to WordPress > the “Themes” tab.
- Click Install next to a theme you have uploaded.

- Select the WordPress installations on which you want to install the uploaded theme.
- By default, a newly uploaded theme is activated. To prevent this, clear the “Activate after installation” checkbox.
- Click Install.

Activating a Theme
You can activate a theme installed on a particular installation or on all installations of the subscription. A WordPress installation can have only one active theme at a time.
To activate a theme for a particular installation:
- Go to WordPress, and then go to the “Themes” tab of an installation card.
- Turn on a theme to activate it. The theme that was previously active will be automatically deactivated.
To activate a theme for all installations of the subscription:
- Go to WordPress > the “Themes” tab.
- Click Activate next to a theme you want to activate.


Removing Themes
You can remove themes from a particular installation or from all installations belonging to a subscription. Note that you cannot remove an active theme. Before removing a currently active theme, activate another theme first.
To remove themes from a particular installation:
- Go to WordPress, and then go to the “Themes” tab of an installation card.
- Click the
 icon next to theme you want to remove. To
remove several themes, select them and click Remove.
icon next to theme you want to remove. To
remove several themes, select them and click Remove. - Click Yes.

To remove themes from all installations of the subscription:
- Go to WordPress > the “Themes” tab.
- Select the themes you want to remove, click Uninstall, and then click Yes.
Updating Themes
If a theme needs updating, you will see “Updates” next to the theme on the “Themes” tab of an installation card. You can update not only free themes but also paid ones if they can be updated in the usual way in the WordPress admin dashboard.
Note: WordPress Toolkit can update paid themes that require a license if the license is present. WordPress Toolkit cannot update paid themes that use non-standard update methods.
You can do the following:
- Update themes for one particular installation. Read how to do so in the “To update a WordPress installation manually” procedure.
- Update themes installed on multiple installations.
- Configure automatic updates for themes. Read how to do so in the “To configure automatic updates for a WordPress installation" procedure.
To update themes on multiple installations:
- Go to WordPress > the “Themes” tab.
- Click Update to version … next to the theme you want to update.
To learn more about the update, click View Details. This will
take you to the theme’s page on wordpress.org.
Note: Before updating the theme, WordPress Toolkit will prompt you to back up your subscription. If you are concerned that the update may break your website, create a backup or use Smart Updates.
- Click Yes.