Copying Data from One WordPress Website to Another
You can copy the content of your WordPress website including files and database to another WordPress website.
Let us say you maintain a non-public (staging) version of a WordPress website on a separate domain or subdomain and a publicly available (production) version of this website on a production domain. You may want to copy data from one website to another in the following situations:
- You want to copy the changes you have made to the staging version to the production version.
- You want to copy the data from the production website to the staging website to see how the changes (for example, a new plugin) work with the production data. After checking that everything works fine, you may copy your changes to your production website.
- You have made some changes (for example, installed a new plugin) to the staging website, and these changes resulted in new tables being added to the database. You want to copy only these tables to the production website without affecting other data.
- You have upgraded the staging website to a newly released version of WordPress and fixed the post-upgrade issues (if any). You now want to push these changes to the production website.
- You can choose to copy the WordPress files, the WordPress database, or both the files and the database. When copying the database, you can choose to copy all tables, or tables that are present on the source but absent from the target, or you can specify individual database tables to be copied.
When performing the copying, keep in mind the following:
- The selected data are copied from the source website to the target website. Any files and/or database tables present both on the source and the target that are not identical are copied from the source to the target. Files and database tables present only on the target are not affected unless you select the “Remove missing files” option during copying.
- During copying, the target website enters maintenance mode and becomes temporarily unavailable.
- If the WordPress version on the target website is earlier than on the source website, WordPress Toolkit first upgrades WordPress on the target website to match the version installed on the source website, and then runs copying.
- If the WordPress version on the source website is earlier than on the target website, copying is aborted. To copy data, you need to upgrade WordPress on the source to the version installed on the target or a later version.
- If the database prefix on the source and the target differs, WordPress Toolkit will change the database prefix on the target website to match that on the source during copying.
- Copying of data between a regular WordPress installation and a multisite one is not supported. We recommend that you use cloning instead.
Note: During copying, files and database tables copied from the source overwrite those present on the target. Any changes made to the files and database tables on the target prior to copying will be discarded and lost without warning.
Note: If you have caching plugins installed on a WordPress website you want to copy from, clear the cache on the source website before copying. Otherwise, the target website might work incorrectly.
To copy data of one WordPress website to another:
- Go to WordPress and then click “Copy Data” on the card of the WordPress installation
which data you want to copy.
- Next to “Target”, select the target WordPress installation
(under the same or another subscription) you want to copy the data to.
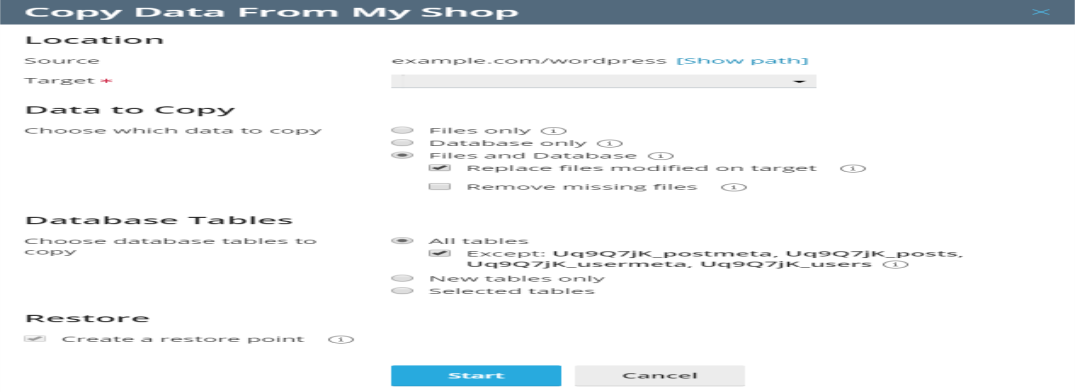
- Under “Data to Copy”, select which data you want to copy to the target WordPress website:
- “Files Only” - copies only the website files, including the
WordPress core files and the files related to themes and plugins.
Note: By default, the
htaccess,web.config, andwp-config.phpfiles are not copied because modifying these files may disrupt the operation of WordPress.Note: The Plesk
 Plesk Panel is the preferred choice for hosting service providers, web designers, and website owners. Plesk Obsidian 18 is the latest release from Plesk and offers a range of new benefits and features for every user type. administrator can make the “Copy wp-config.php”
checkbox visible to you. In this case, even if you choose to copy the
Plesk Panel is the preferred choice for hosting service providers, web designers, and website owners. Plesk Obsidian 18 is the latest release from Plesk and offers a range of new benefits and features for every user type. administrator can make the “Copy wp-config.php”
checkbox visible to you. In this case, even if you choose to copy the wp-config.phpfile, the information related to the database will not be copied. This prevents the target WordPress installation from corruption. Custom settings specified in thewp-config.phpfile on the target will be overwritten with those from the source. - “Database Only” - copies only the database. You can select to import all, new, or selected database tables (for details, see step 5 below).
- “Files and Database” - copies both the website files and the database. You can choose to import all, new, or selected database tables (for details, see step 5 below).
- “Files Only” - copies only the website files, including the
WordPress core files and the files related to themes and plugins.
- If you selected “Files Only” or “Files and Database” during step 3,
two more options become available (unless the Plesk administrator did not hide them):
- “Replace files modified on target” - by default, if a file with the same name exists both on the source and the target, the file from the source will be copied and will replace the file on the target even if the source file is older. To prohibit overwriting files on the target with the files from the source that are older clear the checkbox.
- “Remove missing files” - by default, if a file exists on the target but is missing from the source, the file is untouched. Select this checkbox to remove files on the target that are missing from the source.
- If you selected “Database only” or “Files and Database” during step 3,
select which database tables you want to copy:
- “All Tables” (the default option). If you want to copy all changes except for pages, posts, and users, keep the “Except: _postmeta, _posts, _usermeta, _users” checkbox selected.
- New tables only
- Selected tables. Click “Select tables to copy”, select those tables you want to copy, and then click Select.
- Before copying data, WordPress Toolkit suggests creating a restore point.
You can use it to roll back the changes made during copying.
If you do not want to create a restore point, clear the
“Create a restore point” checkbox. Learn how you can recover
your WordPress installation using the restore point in
“Restoring a WordPress Installation” section below.
Note: Every WordPress installation can only have a single restore point. Creating a restore point overwrites the existing restore point, if any.
- When you are satisfied with the selected options, click Start to start copying data.


