Preview Your Site
After you have uploaded website files to the webspace, you can check how your site will look in a web browser, even before the information about the new site has spread in the Domain Name![]() A domain name is an identification string that defines a realm of administrative autonomy, authority, or control on the Internet. Domain names are formed by the rules and procedures of the Domain Name System (DNS). System.
A domain name is an identification string that defines a realm of administrative autonomy, authority, or control on the Internet. Domain names are formed by the rules and procedures of the Domain Name System (DNS). System.
There are three methods of previewing a website:
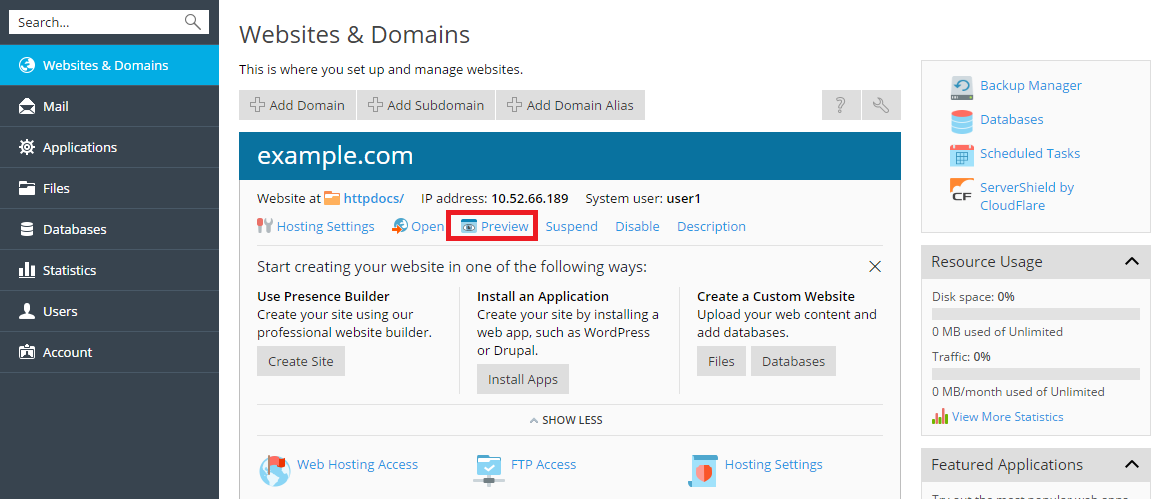
Preview Method #1: via the Hosting Control Panel
- Click the Websites & Domains tab.
- In the list of domain names at the bottom of the screen, locate the website that you want to preview.
- Click Preview below the domain name of the website that you want to preview.
- You site will open in a new browser window.
| Note: For sites created with Web Presence Builder, protected access to site pages can work incorrectly in Preview mode. |
Preview Method #2: via the Preview URL
A simple method of previewing your website is via https://www.previewmywebsite.ca/domainname.ca or simply http://previewmywebsite.ca
| Note: This preview method may not work entirely, given that some websites are built to reference their intended domain name, and not the preview URL |
Preview Method #3: via the modifying your Hosts file
The Hosts file is where a user manually enters a hostname (i.e. a domain name) and pairs it to an IP address![]() An Internet Protocol address (IP address) is a numerical label assigned to each device (e.g., computer, printer) participating in a computer network that uses the Internet Protocol for communication. An IP address serves two principal functions: host or network interface identification and location addressing, thereby bypassing the regular DNS
An Internet Protocol address (IP address) is a numerical label assigned to each device (e.g., computer, printer) participating in a computer network that uses the Internet Protocol for communication. An IP address serves two principal functions: host or network interface identification and location addressing, thereby bypassing the regular DNS![]() The Domain Name System (DNS) is a hierarchical distributed naming system for computers, services, or any resource connected to the Internet or a private network. It associates various information with domain names assigned to each of the participating entities. A Domain Name Service resolves queries for these names into IP addresses for the purpose of locating computer services and devices worldwide. By providing a worldwide, distributed keyword-based redirection service, the Domain Name System is an essential component of the functionality of the Internet. process that would normally occur. This then results in the browser routing to the designated IP address whenever the corresponding hostname (domain name) is entered into the browser. The most common reason for a user to do this is allowing them to view a website which is not publicly available.
The Domain Name System (DNS) is a hierarchical distributed naming system for computers, services, or any resource connected to the Internet or a private network. It associates various information with domain names assigned to each of the participating entities. A Domain Name Service resolves queries for these names into IP addresses for the purpose of locating computer services and devices worldwide. By providing a worldwide, distributed keyword-based redirection service, the Domain Name System is an essential component of the functionality of the Internet. process that would normally occur. This then results in the browser routing to the designated IP address whenever the corresponding hostname (domain name) is entered into the browser. The most common reason for a user to do this is allowing them to view a website which is not publicly available.
- Open your HOSTS file on your computer.
- For older versions of Windows (95/98/ME) it will normally be found here: C:\windows\hosts
- Newer versions of Windows will have it here: C:\windows\system32\drivers\etc\hosts
- If prompted, chose to open the file with Notepad.
- The Hosts file contains both existing and sample entries by default. Do not make changes to any existing entries.
- Add additional lines for your domain.
- Type the IP address of the server hosting your website content and then your domain name. As an example the two entries you would add to the file would be:
64.69.83.165 yourdomainname.ca
64.69.83.165 www.yourdomainname.ca
| NOTE: The IP address of the server hosting your website content can be found in your Hosting welcome email. |
- Save the changes made to the Hosts file and completely restart any open browsers
- Using a new browser window, type in your domain name and press Enter. The website content located on the server will be displayed.
- Mac OS you will be using Terminal and VI or also known as text editor.
- Open Terminal which will be situated in the Utilities folder under Applications.
- Make a backup of the existing Hosts file.
- On the terminal line type: sudo cp /private/etc/hosts /private/etc/hosts-original (Enter user password if prompted).
- Open and Edit the Hosts file,
- On the terminal line type: sudo vi /private/etc/hosts (Enter user password if prompt).
- The Hosts file contains both existing and sample entries by default. Do not make changes to any existing entries.
- Add additional lines for your domain.
- Type the IP address of the server hosting your website content and then your domain name. As an example the two entries you would add to the file would be:
64.69.83.165 yourdomainname.ca
64.69.83.165 www.yourdomainname.ca
- Save the changes made to the Hosts file (:wq)
| Note: You may run into permission errors along this procedure, terminal is most likely not running as the root folder. Enable by going to the 'Help' menu and search for the wood 'root'. There will be an article for enabling ‘’root users’’ |
- Restart any open browsers and flush you DNS cache.
- DNS can be cached by entering this line in terminal: dscacheutil -flushcache
- Using a new browser window, type in your domain name and press Enter. The website content located on the server will be displayed.