Text, Tables, Hyperlinks, and Images
Before you start working on website content, we suggest that you select the appropriate website language in Settings tab > Languages > Website language menu.
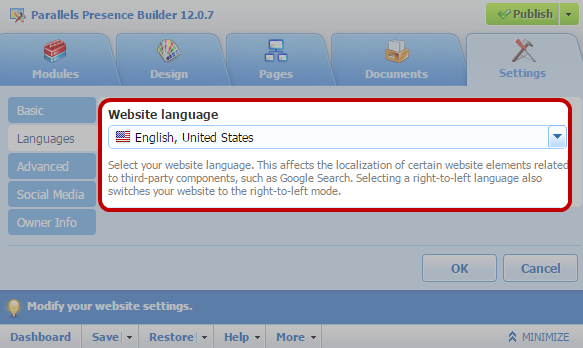
The website language is a site-wide setting that defines the language in which you will be adding content to your website. It affects the following:
- The language in which certain website elements (in particular those provided by third-party services), such as Google Search and navigation buttons in image galleries, will be shown. Note that not all third-party services and modules provided by the editor support all available languages.
- The direction in which you will type text in the editor (from left to right or from right to left). If you select a right-to-left language, your website content and design will be RTL-enabled.
| Note: Changing a website language does not reload the currently selected website topic in a different language. The topic language will remain unchanged, however, the text orientation will change. |
To add text, lists, tables, or images to a page:
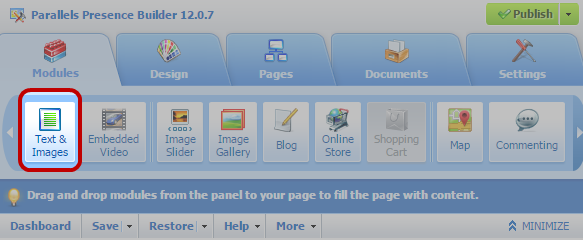
Go to the Modules tab, select Text & Images, and drag the module to the page:
To add a block with text and images to the current page, drag the module to any of the areas marked with the text CONTENT. Such areas are located within the main content block and near the top of each sidebar.
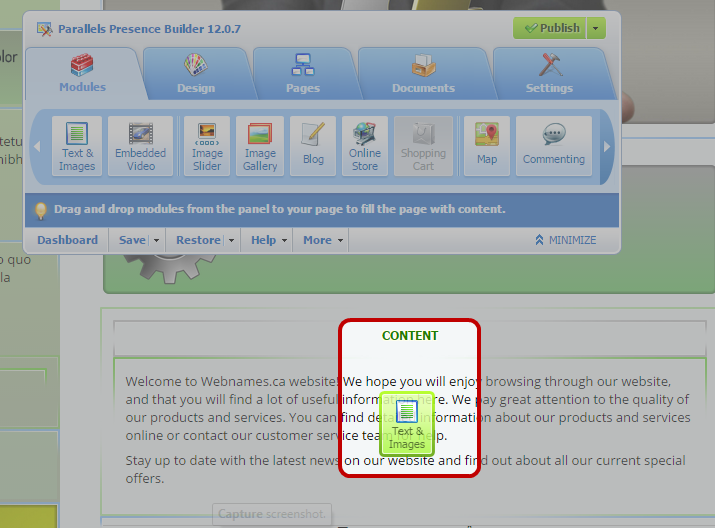
To divide the content area into columns and insert a block into one of them, drag the module to the left or right edge of the content area and then insert it. Note that sidebar areas cannot be divided into columns.
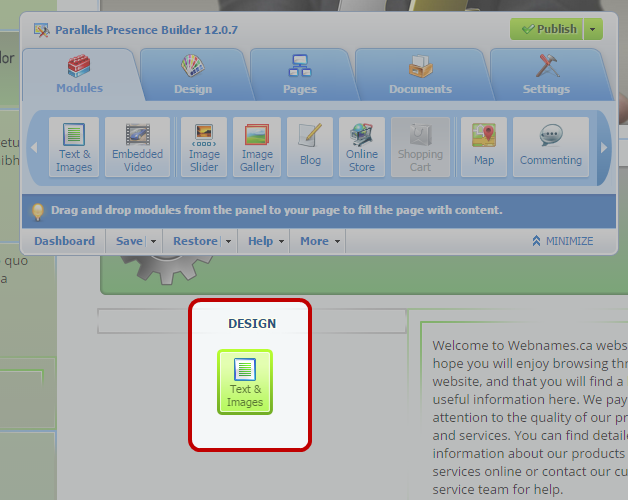
To add a block with text and images to all pages of the site, drag the module to any of the areas marked with the text DESIGN. Such areas are located above and below the main content block, in sidebars, header, and footer.
Type the text on the screen and use the icons on the module's toolbar to format the text, add tables, hyperlinks, and images.
The toolbar of the Text & Images module provides access to the following tools and functions.
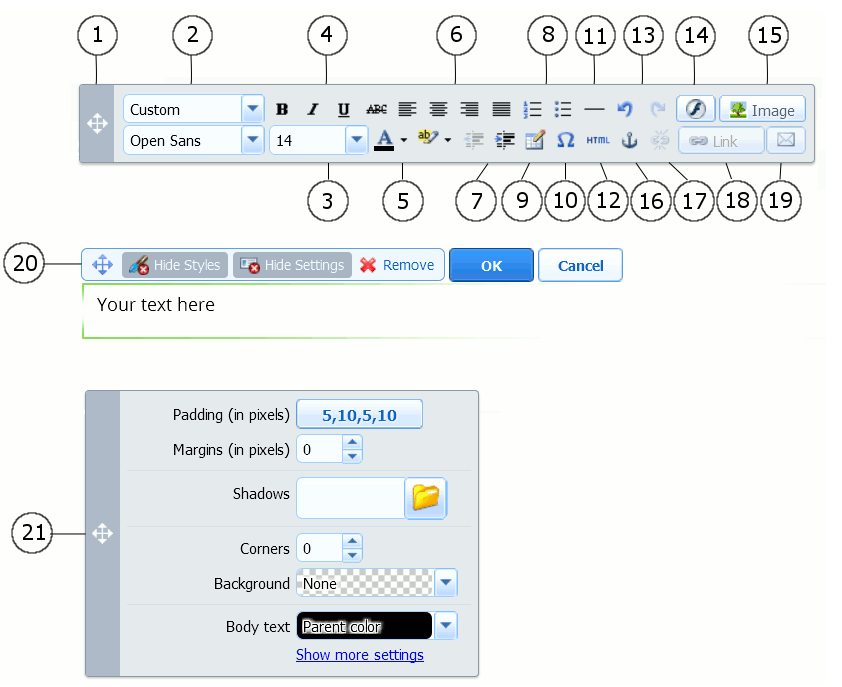
- Move the toolbar.
- Select the paragraph style and font face. Note that the Terminal font is not supported by Google Chrome.
- Select the font size.
- Select the font style: bold, italics, underlined, and strikethrough.
- Select the text and background colors.
- Select text alignment: left, center, right, or justified (aligned to both the left and right margins with added extra spaces between words).
- Increase and decrease the indent level of the paragraph.
- Start a numbered or bulleted list.
- Insert a table and specify the number of rows and columns.
- After you insert a table, a number of additional icons become accessible from the toolbar. Use them to change the properties of the table rows and cells, to insert and remove rows and columns, or to split and merge table cells.
- Insert symbols that are not on your keyboard, such as copyright and trade mark signs, and other Unicode symbols.
- Insert a horizontal line.
- Edit the HTML
 HyperText Markup Language (HTML) is the main markup language for displaying web pages and other information that can be displayed in a web browser. source code of the page.
 - Undo and redo changes.
- Insert a Flash object in the SWF format.
- Insert an image, adjust its size, specify a description, and text wrapping.
- You can choose to show the description below the image, show it over the image only when users hover the mouse pointer over it, or to not show it. The description also serves as alternative text: In browsers that do not support or are configured to not show images, the description will be shown instead.
- If you want to insert many pictures into a single page, consider using the Image Gallery module instead of the Text & Images module. With Image Gallery, you can upload pictures from your local computer or use pictures published to the Picasa Web Albums photo sharing service. To learn more about the Image Gallery module, see the section Image Gallery.
- If you want to add a slide show with multiple images, use the Image Slider module. To learn more about the Image Slider module, see the section Image Slider.
- Insert HTML anchors into particular sections of webpages so that you can link to them from the same or other pages of your site.
- Remove hyperlinks from selected text.
- Add hyperlinks to pages of your website or external resources.
- Add a link to an email address.
- To learn more about adding hyperlinks, see the section Hyperlinks, Links to Email Addresses, and Anchors.
- Move the text and image block within the webpage, remove the block with its contents, save changes, cancel the changes made.
- Move the styles panel, specify the style of elements in the text and images block.
- If you want to insert many pictures into a single page, consider using the Image Gallery module instead of the Text & Images module. With Image Gallery, you can upload pictures from your local computer or use pictures published to the Picasa Web Albums photo sharing service.
To add an image gallery to your site and upload pictures:
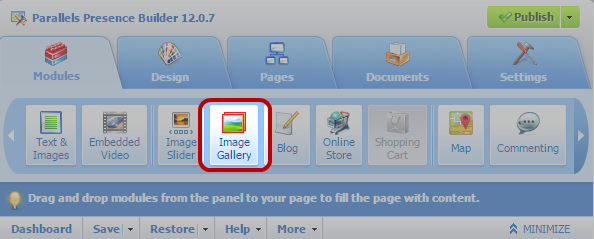
- Go to the Modules tab, select Image Gallery, and drag the module to the page.
- In module settings, on the Image Storage tab, select where you want to keep pictures:
- If you do not have a Picasa Web Albums account that you would like to use, leave the Web Presence Builder option selected. All images you use on your site will be kept on your customer account.
- If you have an account in Picasa Web Albums and want to use pictures that you store there on your site, do the following:
- Select the Picasa option, click the link on the Image Storage tab to sign in to Google, and grant access to your albums from Web Presence Builder.
- Select the album whose pictures you want to use or click Create Album to create a new album.
- If you want Web Presence Builder to remove images from Picasa Web Albums when you remove them from the gallery, select the checkbox Delete images when I remove them from gallery.
When you upload images to an image gallery through the Web Presence Builder editor, they are automatically copied to your Picasa Web Albums account. When you remove images from the gallery, they are removed from Picasa Web Albums only if you have selected the option Delete images when I remove them from gallery.
- (Optional step.) If you want to select the size of image thumbnails to be shown in the image gallery, click the Gallery Properties tab and select the size of thumbnails:
- Small (95 x 75 pixels).
- Normal (140 x 130 pixels). This is the default setting.
- Large (170 x 170 pixels).
- To add images to the gallery, click the text Click here to upload your images, select the images that you want to upload, and click OK.
You can select and upload multiple images at once. Only images in GIF, JPEG, and PNG formats are supported.
We recommend that you use resized images that do not exceed 1024 x 768 pixels.
- To change image title and description, click the corresponding thumbnail, click the title or description, and edit the text.
If you delete the default text entirely, it will not be shown on your published site; however, it will still be shown when you edit the site in the Web Presence Builder editor.
To remove an image from the gallery:
Place the mouse pointer over the image thumbnail and click the icon [x].
To remove an image gallery with all pictures:
Place the mouse pointer over the image gallery block and click Remove.
Image Slider
The Image Slider module enables you to add a slide show with multiple images and various transition effects. The following image formats are supported: GIF, JPEG, and PNG.
Images are not resized automatically; for this reason, we recommend that you upload images of the same dimensions. Otherwise, the slide show will not look good.
When adding images, you can add descriptions to them and link the images to specific pages of your website.
The following transition effects are supported:
- Random
- Slice down and to the right
- Slice down and to the left
- Slice up and to the right
- Slice up and to the left
- Slice up and down
- Slice up and down and to the left
- Fold
- Fade
- Box random
- Box rain
- Reverse box rain
- Growing box rain
- Reverse growing box rain
The effect names might tell you little about how the effects look, so it is better to see them in action. To do this, add the Image Slider module, upload at least two images, go to the module settings (Settings tab), and select an effect from the Transition effect menu.
To add Image Slider to your site and upload pictures
- Go to the Modules tab, select Image Slider, and drag the module to the page.
- Click Add Images, select the images that you want to upload, and click OK.
- You can select and upload multiple images at once. We recommend that you use resized images that do not exceed 1024 x 768 pixels.
- Once you have uploaded images, you can arrange them in the desired order, and remove them. To do any of these actions, place the mouse pointer over an image thumbnail, and use the corresponding icons: .
- To add an image description, select a thumbnail, and type the text into the Description box.
- To add a link to a webpage, select a thumbnail, select the option Link to a webpage, and select the page from the menu below.
- Click the Settings tab and select the desired transition effect from the Transition effect menu.
- Specify how long each image must be shown.
- Specify whether the round navigation icons for switching between slides must be shown.
- The option Inside will show the icons over the images, in the upper right corner of Image Slider, and Below will show the icons below the images.
- Specify whether the navigation arrows for switching between slides must be shown.
- Click OK.
To remove an image from the slide show
Click on the slide show block, place the mouse pointer over the image thumbnail, and click the X icon .
To remove a slide show with all pictures
Place the mouse pointer over the slide show block and click Remove.