Mac Mail OSX 10.5 IMAP SSL
This guide provides instructions for configuring Mac Mail![]() Mail, Mac OS X's built in email application, offers an elegant user interface that makes it easy to manage all of your email from a single, ad-free inbox, even when you're not connected to the Internet.
http://www.apple.com/support/mail/ to access your Webnames.ca hosted email account via IMAP
Mail, Mac OS X's built in email application, offers an elegant user interface that makes it easy to manage all of your email from a single, ad-free inbox, even when you're not connected to the Internet.
http://www.apple.com/support/mail/ to access your Webnames.ca hosted email account via IMAP![]() Internet Message Access Protocol: IMAP connectivity results in your email client downloading email from our mail server to your computer, however a copy of the email is retained on our mail server until such time that you delete the email from your computer. using SSL
Internet Message Access Protocol: IMAP connectivity results in your email client downloading email from our mail server to your computer, however a copy of the email is retained on our mail server until such time that you delete the email from your computer. using SSL![]() By utilizing SSL, the email session between your email client and our email server will be encrypted. The use of Secure Mail is recommended for all customers who access the Internet over a open shared network such as a public wireless hot-spot, or via a cellular provider's mobile network.. The guide assumes that email services have been purchased, and that email addresses have been created in the email administration interface. http://mailadmin.webnames.ca Use postmaster@ account credentials to access.
By utilizing SSL, the email session between your email client and our email server will be encrypted. The use of Secure Mail is recommended for all customers who access the Internet over a open shared network such as a public wireless hot-spot, or via a cellular provider's mobile network.. The guide assumes that email services have been purchased, and that email addresses have been created in the email administration interface. http://mailadmin.webnames.ca Use postmaster@ account credentials to access.
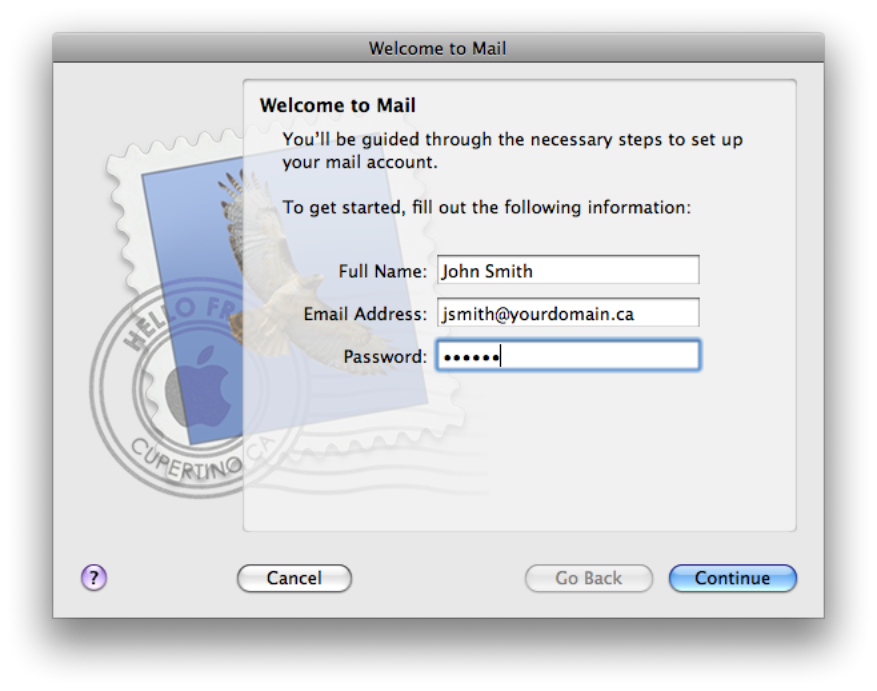
If you have never used Mail on your Mac before, you will be asked to create an email address as soon as you launch the program, as indicated in the screenshot below. If you already have a mail account on your computer, you will need to use these steps:
- Click on the "Mail" menu, and then select "Preferences".
- Click on the "Accounts" button at the top of the window that appears.
- Click the "+" button at the bottom left side of the window.
- This will take you to the screen indicated below; simply enter your name, email address and your password. Replace "yourdomain.ca" and "John Smith" with your actual domain name and name respectively. Click "Continue" when finished.
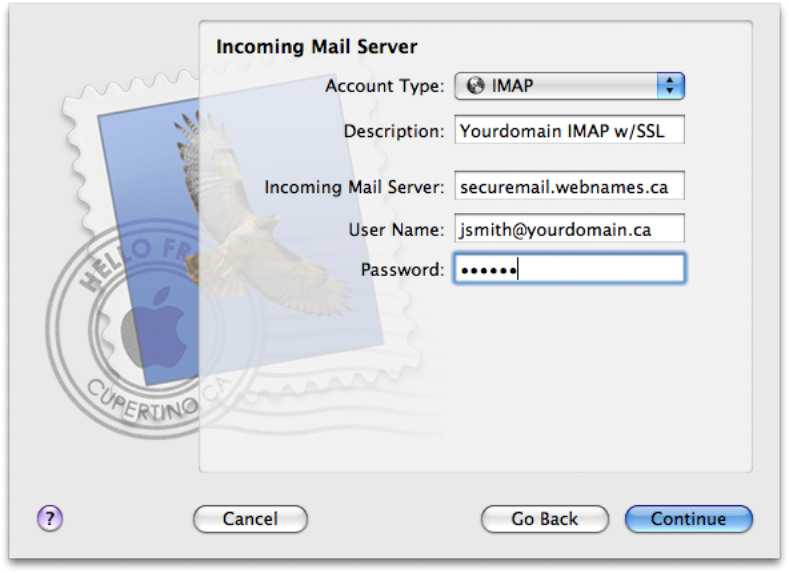
- Enter your details as in the following screenshot, substituting your domain name anywhere it says "yourdomain.ca" and your e-mail account name anywhere it says "jsmith"
- Account Type: IMAP
- Description: This value can be anything you like, and will not affect the functionality of your email services.
- Incoming mail server: securemail.webnames.ca
- User Name: Full Email Address
- Password: Your Password
- Click on the "Continue" button.
- Once you click Continue, Mail will check the mail server using the settings you entered. When you see this message, you will need to wait a few moments for the connection with the server to be established. Once established, click the “Continue” button to proceed
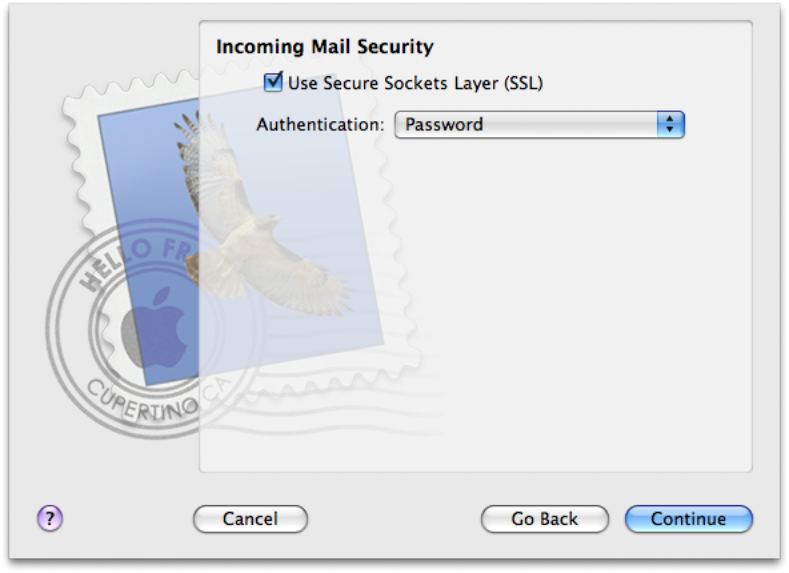
- This will take you to an “Incoming Mail Security” dialog. Simply ensure that “Use Secure Sockets Layer” is checked, then click “Continue” to proceed.
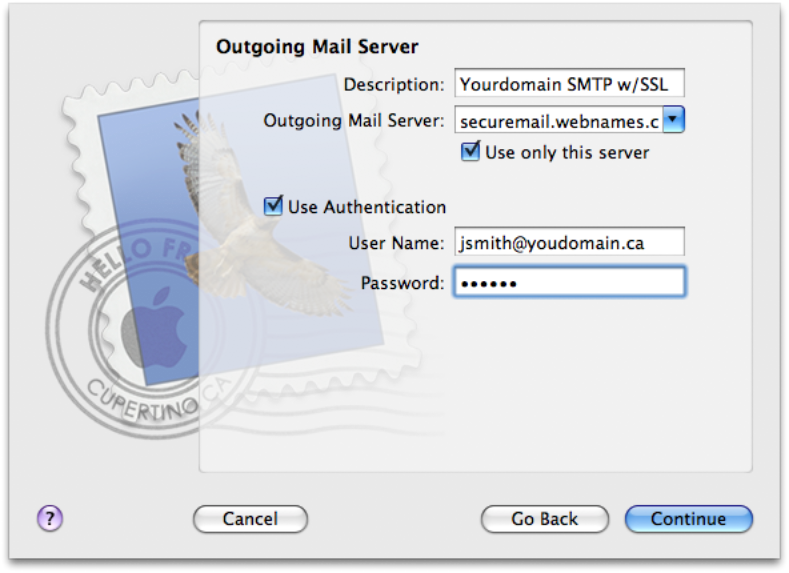
- Enter your details as in the following screenshot, substituting your domain name anywhere it says "yourdomain.ca" and your e-mail account name anywhere it says "jsmith"
- Description: This value can be anything you like, and will not affect the functionality of your email services.
- Outgoing mail server: securemail.webnames.ca
- Use Authentication: Checked
- User Name: Full Email Address
- Password: Your Password
- Click on the "Continue" button.
- As before, check the box labeled “Use Secure Sockets Layer (SSL)”, like we did in the Incoming Mail Security dialog. Click “Continue” to proceed.

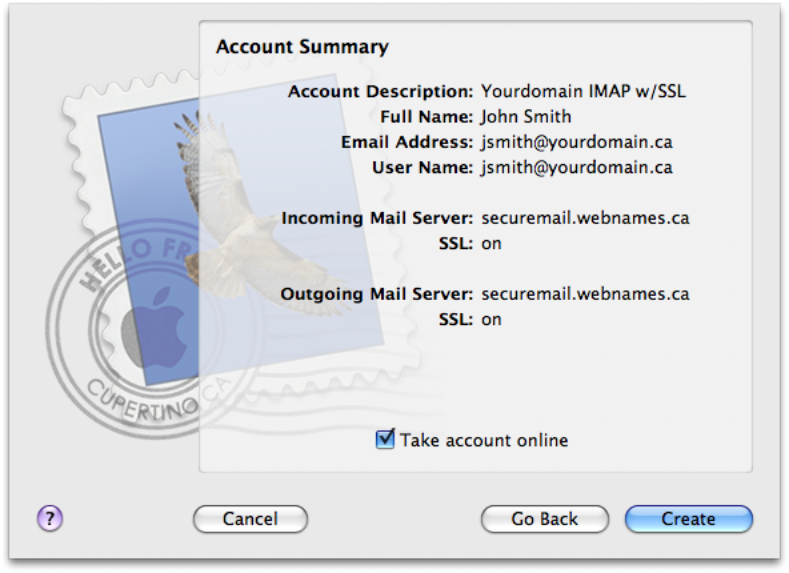
- The confirmation screen is shown where Mail will display the information you’ve entered.
- Review the information to ensure no mistakes or typos appear in the settings, if any appear click “Go Back” and correct the mistake.
- Check the “Take account online” check box, then click “Create”.
- Click the red jewel at the top left of the settings window, and make sure to click “Save” if prompted to save the changes.