Apple iOS 13 using IMAP w/ SSL
This guide provides instructions for configuring your iOS device![]() The iPhone is a line of smartphones designed and marketed by Apple Inc.
http://www.apple.com/ca/iphone/ to access your Webnames.ca hosted email account. We recommend using an IMAP
The iPhone is a line of smartphones designed and marketed by Apple Inc.
http://www.apple.com/ca/iphone/ to access your Webnames.ca hosted email account. We recommend using an IMAP![]() Internet Message Access Protocol: IMAP connectivity results in your email client downloading email from our mail server to your computer, however a copy of the email is retained on our mail server until such time that you delete the email from your computer. configuration which utilizes SSL
Internet Message Access Protocol: IMAP connectivity results in your email client downloading email from our mail server to your computer, however a copy of the email is retained on our mail server until such time that you delete the email from your computer. configuration which utilizes SSL![]() By utilizing SSL, the email session between your email client and our email server will be encrypted. The use of Secure Mail is recommended for all customers who access the Internet over a open shared network such as a public wireless hot-spot, or via a cellular provider's mobile network., as not only is it the default method for the iOS device to connect to, but this connection also provides the most flexibility and security available. The guide assumes that email services have been purchased, and that email addresses have been created in the email administration interface. http://mailadmin.webnames.ca Use postmaster@ account credentials to access.
By utilizing SSL, the email session between your email client and our email server will be encrypted. The use of Secure Mail is recommended for all customers who access the Internet over a open shared network such as a public wireless hot-spot, or via a cellular provider's mobile network., as not only is it the default method for the iOS device to connect to, but this connection also provides the most flexibility and security available. The guide assumes that email services have been purchased, and that email addresses have been created in the email administration interface. http://mailadmin.webnames.ca Use postmaster@ account credentials to access.
Setup
To set up a new account on your iOS device, first go to your home screen by pressing the home button. Once on the home screen, locate the “Settings” icon and touch it to begin.
Once in the Settings app, use the steps below:
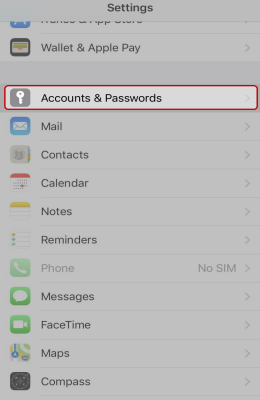
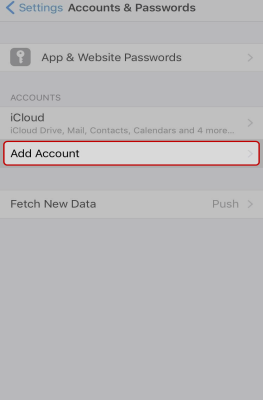
- Touch the “Accounts & Passwords” option, then touch “Add Account”
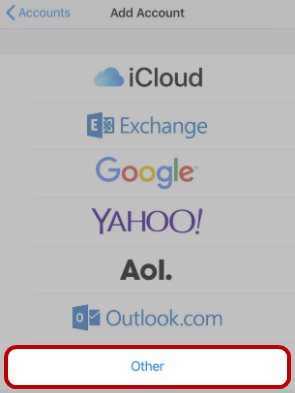
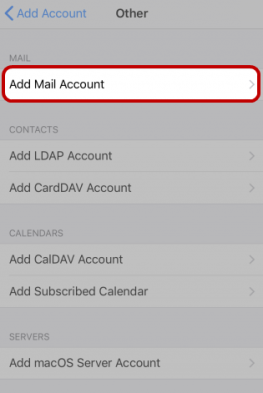
- Select “Other” as the type of account to add, and then select “Add Mail Account” option on the following screen.
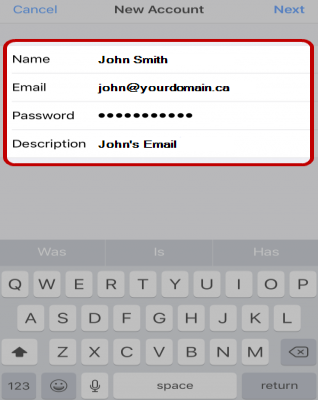
- On the following screen, enter your name, email address and password. Your iOS device will automatically assign a description based on what you enter above, but you can customize the description as what ever you like. The description is simply what the email address will be known as in Mail.app when you’re finished configuring the account.
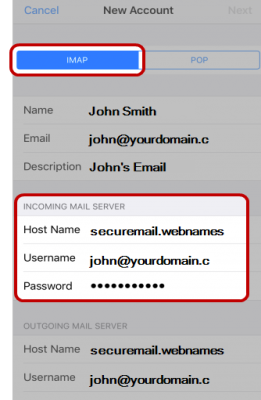
- On the following screen, make sure to select 'IMAP’ as indicated below, and use the following settings:
- Incoming Mail Server
- Host Name:securemail.webnames.ca
- User Name:Full Email Address
- Password:Your Password
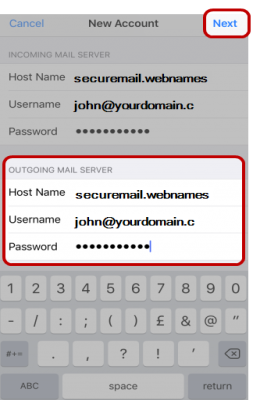
- Outgoing Mail Server
- Host Name:securemail.webnames.ca
- User Name:Full Email Address
- Password:Your Password
- Once you’re done, click the “Next” button at the top left corner.
- Your iOS device will verify the settings, which can take a moment. Once it’s done, it will ask you to Save your settings.
- Open the Mail application from your home screen, your email account will now appear.
Advanced Server Ports and SSL
If you experience issues with sending or receiving email, whereby the error message being observed relates to communication issue with the mail server, please check the server port numbers and SSL setting via the following steps:
- Navigate to Settings > Passwords & Accounts
- Tap your Webnames-supplied email account.
- Tap Account to view the basic settings.
- Tap Advanced towards the bottom.
- Scroll down to view all settings.
Confirm the following details:
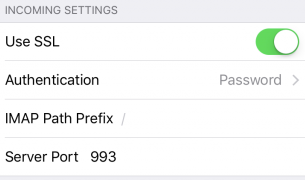
Incoming settings
- Use SSL is Enabled.
- Authentication:Password
- IMAP Path / Prefix: Left Blank
- Server Port: 993
Return to the previous menu
- Tap the Account button at the top of the screen.
- Scroll down to Outgoing Mail Server
- Tap the SMTP entry with securemail.webnames.ca.
- Tap securemail.webnames.ca again, which will be listed under Primary Server.
Confirm the following details:
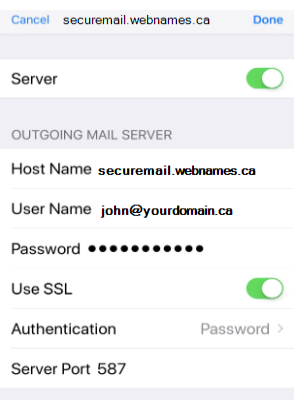
Outgoing settings
- Host Name: securemail.webnames.ca
- Username: Full Email Address
- Password: Your Password
- Use SSL is Enabled
- Authentication:Password
- Server Port: 587 (Optionally, port 465)
Tap Done. The server details will now be checked and your email account will be available for use.
Default Mailbox Folders
If mail items located on your phone are not syncing with your other devices or webmail, you may need to adjust the 'Mailbox Behavior' settings to ensure that your email appears in the designated folder on our mail server.
- Navigate to Settings > Passwords & Accounts.
- Tap your Webnames-supplied email account.
- Tap Account to view the basic settings.
- Tap Advanced towards the bottom.
Under the heading of Mailbox Behaviors, associate each of the following folders on your iOS device with the desired corresponding folder on the mail server.
- Drafts Mailbox
- Sent Mailbox
- Deleted Mailbox
- Archive Mailbox
This association is bi-directional and is the means through which emails are synced across multiple devices. Therefore to maintain proper synchronization, all of your devices will need to be configured in an identical manner.
When finished, tap Advanced > Account > Done at the top.
Your messages now appear in the selected mail server folder instead of only in your iOS device folder.