Thunderbird 3 using POP3 w/ SSL
This guide provides instructions for configuring Thunderbird![]() Mozilla Thunderbird is a free, open source, cross-platform email and news client developed by the Mozilla Foundation.
http://www.mozilla.org/en-US/thunderbird/ 3 to access your Webnames.ca hosted email account via POP3
Mozilla Thunderbird is a free, open source, cross-platform email and news client developed by the Mozilla Foundation.
http://www.mozilla.org/en-US/thunderbird/ 3 to access your Webnames.ca hosted email account via POP3![]() Post Office Protocol (3): POP3 connectivity results in your email client downloading email from our mail server to your computer. Once downloaded to your computer, the email no longer exists on our mail server.. The guide assumes that email services have been purchased, and that email addresses have been created in the email administration interface. http://mailadmin.webnames.ca Use postmaster@ account credentials to access.
Post Office Protocol (3): POP3 connectivity results in your email client downloading email from our mail server to your computer. Once downloaded to your computer, the email no longer exists on our mail server.. The guide assumes that email services have been purchased, and that email addresses have been created in the email administration interface. http://mailadmin.webnames.ca Use postmaster@ account credentials to access.
To setup your Thunderbird 3 e-mail client to work with your e-mail accounts please follow the steps below:
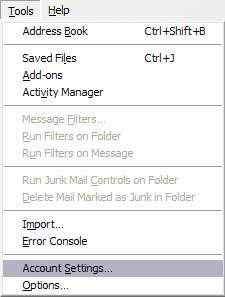
- To get started, open Thunderbird and then click on "Account Settings..." in the Tools menu.
- Once in the Account Settings window, click on the "Account Actions" button and then "Add Account".

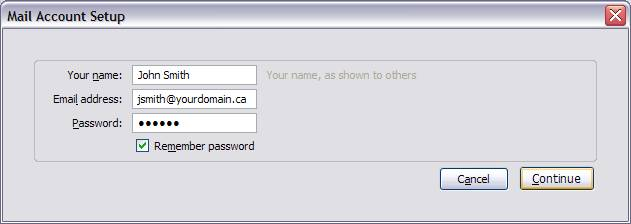
- Fill out these fields with your name, full email address, and email password. If you do not want to type your password each time you check your emails make sure to check the "Remember password" box. Click Continue when done.
- Thunderbird 3 contains a new system which attempts to automatically configure your email account, unfortunately this is not compatible with Webnames services.
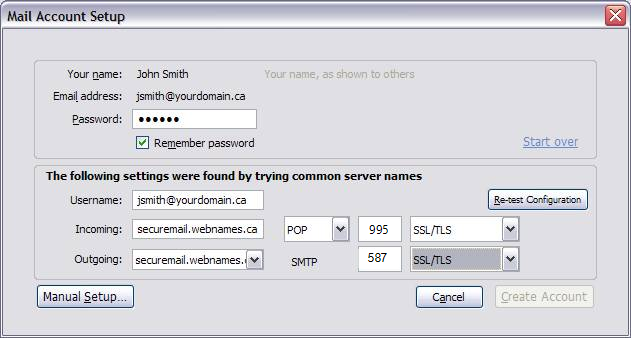
- Let Thunderbird attempt to discover the settings, once it is done, the "Stop" button will change to "Edit", and when it does, click the Edit button.
- Enter your details as in the following screenshot, substituting your domain name anywhere it says "yourdomain.ca" and your e-mail account name anywhere it says "jsmith"
- Password: Your Password
- Incoming: securemail.webnames.ca
- Incoming Server Type: POP
- Incoming Server Port: 995
- Outgoing: securemail.webnames.ca
- Outgoing Server Port: 587 (Optionally, port 465)
- Once you’ve finished, click the "Manual Setup" button.
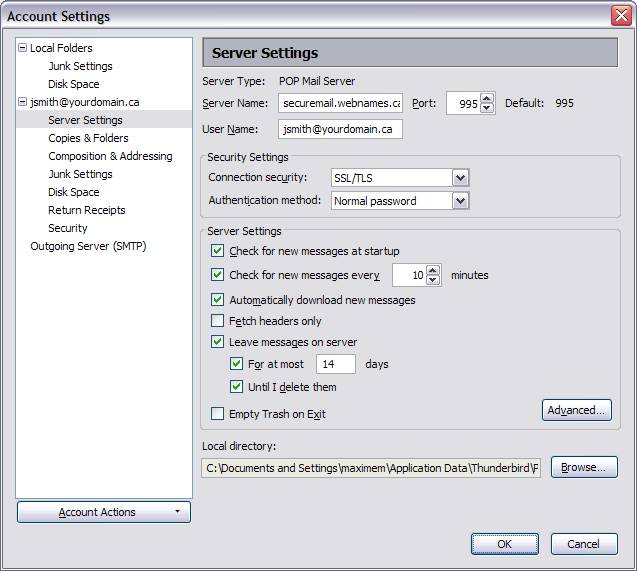
- Click the Server Settings menu entry, and enter or confirm the following details:
- Server Name: securemail.webnames.ca
- Port: 995.
- User Name: Full Email Address
- Connection security: SSL/TLS

- When finished, click the Outgoing Server (SMTP) menu entry in the tab list on the left.
- Select the Outgoing server in the list for your new account (it should read: - securemail.webnames.ca).
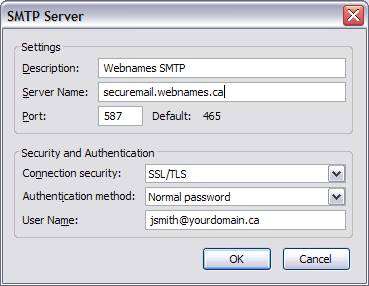
- Once selected, click the "Edit" button, as indicated in the screenshot below.
- Enter what ever name you wish for the description, make sure it is something you will recognize. In the example below we’ve named it: "Webnames SMTP". Ensure the following:
- Sever Name: securemail.webnames.ca
- Port: 587 (Optionally, port 465)
- Connection Security: SSL/TSL
- Authentication method: "Normal password"
- User Name: Full Email Address
- Once finished, click on the OK button on this, as well as subsequent windows to complete the account setup.