Outlook Setup Guide for Activesync Exchange Service
Outlook using Activesync w/SSL
This guide provides instructions for configuring Outlook![]() Microsoft Outlook offers premium business and personal e-mail management tools to more than 500 million Microsoft Office users worldwide. Outlook is part of Microsoft Office.
Microsoft Outlook versions include 97, 2000, 2003, 2007 and 2010.
http://office.microsoft.com to access your Webnames.ca hosted email account. All desktop versions of Outlook (which excludes cloud-based versions such as Office 365, and Microsoft's "New Outlook"), will follow these same general steps, however the location and look of certain steps may differ slightly.
Microsoft Outlook offers premium business and personal e-mail management tools to more than 500 million Microsoft Office users worldwide. Outlook is part of Microsoft Office.
Microsoft Outlook versions include 97, 2000, 2003, 2007 and 2010.
http://office.microsoft.com to access your Webnames.ca hosted email account. All desktop versions of Outlook (which excludes cloud-based versions such as Office 365, and Microsoft's "New Outlook"), will follow these same general steps, however the location and look of certain steps may differ slightly.
To setup your Outlook email client using Activesync![]() ActiveSync allows mail clients running on devices such as mobile and desktop to be synchronized a server. with SSL
ActiveSync allows mail clients running on devices such as mobile and desktop to be synchronized a server. with SSL![]() By utilizing SSL, the email session between your email client and our email server will be encrypted. The use of Secure Mail is recommended for all customers who access the Internet over a open shared network such as a public wireless hot-spot, or via a cellular provider's mobile network. to work with your e-mail accounts please follow the steps below:
By utilizing SSL, the email session between your email client and our email server will be encrypted. The use of Secure Mail is recommended for all customers who access the Internet over a open shared network such as a public wireless hot-spot, or via a cellular provider's mobile network. to work with your e-mail accounts please follow the steps below:
| NOTE: If you are switching from an existing IMAP or POP3 connection to using Activesync, the following steps will create a new connection in Outlook to your existing email account. After this new connection is created and working, the previous IMAP connection can be deleted. No mail will be lost, since with both IMAP and Activesync, your email resides on the our mail server at all times. |
- Select the Windows icon in the lower left of your desktop, type Control Panel in the search box and select it.
- In Control Panel, search for Mail in the top right, and select it from the results.
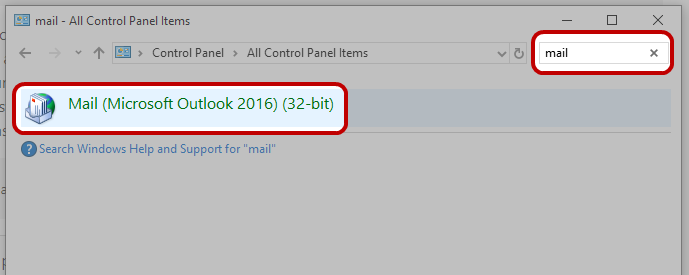
- The Mail icon won't appear unless you have Outlook installed and have run the program at least once.
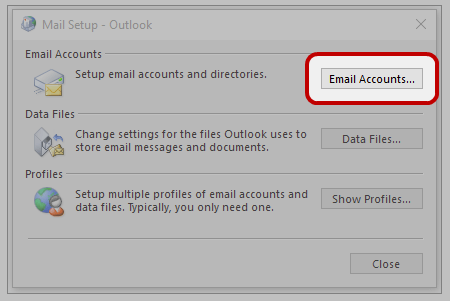
- After the Mail Setup dialog box opens, click E-mail Accounts.
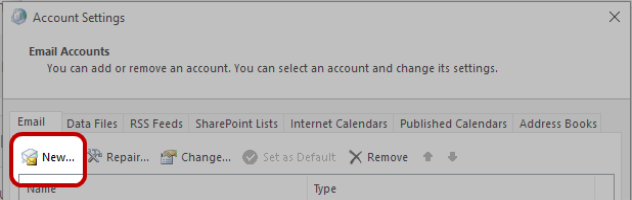
- In the Account Settings window, click New...
- Select Email Account, and click Next
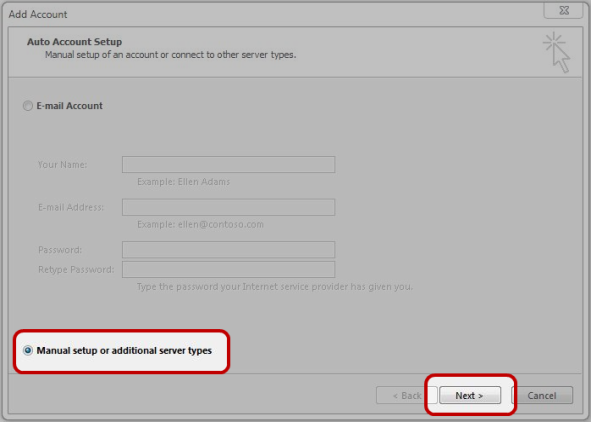
- Select Manually configure server settings or additional server types and click Next.
- Select Activesync compatible service radio button, then click Next

- Enter your details as in the following screenshot, substituting your domain name anywhere it says "yourdomain.ca" and your e-mail account name anywhere it says "jsmith"
- Your Name: Your Full Name
- Email Address: Your Email Address
- Mail Server: securemail.webnames.ca
- User Name:Full Email Address
- Password: Your Password
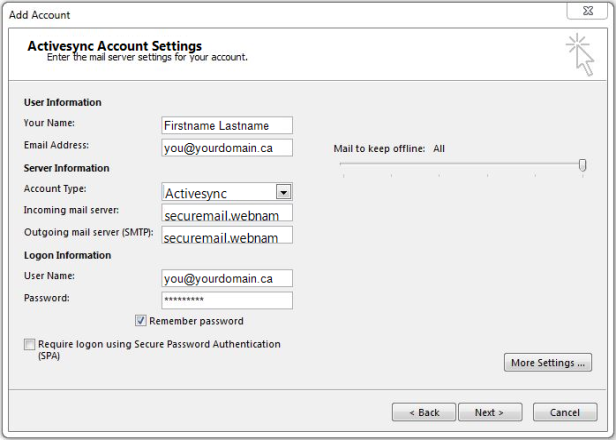
- Click Next, after which a connection test will be performed by the software.
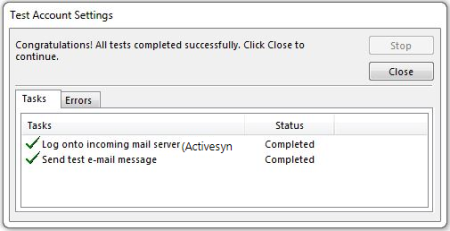
- If the test is successful you should see a window similar to the one below. Make sure all of the tests succeed, if any of them fail, please go over the steps above and make sure no mistakes were made.If everything check’s out then close this window by clicking on the Close button.
- Click the Next and then Finish button to complete the setup process.